Thank you for purchasing this solution. Remember, we are here to help you at every stage of your journey. You can talk to us, and we will always support you via our helpdesk.
Introduction
Blastigo is an online classified ads script with tons of features and controls.
You can start your online advertising platform today with Blastigo script, it's a full solution for the e-advertising such as
Craigslist, OLX, Dubbizzle, Quikr, Opensouq, Alsouq and many more. You can offer featured ads listing and make profits.
Blastigo has a clean, responsive and user-friendly design. You can manage almost everything in your site with its powerful Admin panel. It is secure, SEO-optimized, fast, fully customizable and easy to use.
Technologies used:
PHP CodeIgniter
HTML 5
CSS 3
Bootstrap 4
JQUERY
AJAX
Key Features:
Clean and Responsive Design
Built Using Bootstrap 4
Totally Secure System
Seo Optimized
SEO-Friendly URL
RTL Support
Progressive Web Apps (PWA) Support
Classified Ads (Listing Ads)
listing Physical Products
listing Digital Products
Selling License Keys
Multilingual System (Any language can be added easily)
Accept Payments via Internal Wallet, Cash on Delivery "COD", Stripe, PayPal, CoinPaymnents, PayStack, Razorpay, Flutterwave, PayTabs, Iyzico, and Midtrans Payment Gateways
Accept Payments via Bank Wire / SEPA / IPA, Western Union / Moneygram and any manual payment
Guest Checkout
Help Center (With Ticket System and Knowledge Base)
Refund System (eShop Addon)
Membership Packages System
Advertiser Dashboard
Earnings
Payouts
PayPal, IBAN and SWIFT Payment Options for Payouts
Currency Options (With different currency format options)
Report Abuse Option for Products / Lis, Comments and Reviews
Email Notifications
Commission Rate for Sales (eShop Addon)
Bank Transfer Notifications
Editable & Sortable Navigation (With mega menu)
Responsive & Sortable Slider (With show & hide Option)
Bulk Ads Upload
Promoted Products (With enable & disable option and editable Daily and Monthly pricing)
Pending Products
Hidden Products
Drafts
Ad Location Map
Image, Video, Audio and URL Preview Options
Add, Edit, Delete Unlimited Ads Categories
Bulk Category Upload
Custom Fields System (A new field can be added easily)
Ads Variations (Add available options, like color or size that buyers can choose during checkout)
AWS S3 Integration
Coupons System
Cache System
RSS Feeds
Social Login (Facebook, Google and VKontakte)
Payment Settings
Advance Search (Products and Members)
Filter & Sort Porducts
Member Profile Pages
Last Seen Time
Update Profile Information & Change Password
Location Settings & Social Links for Members
Favorites (Add & Remove from List)
Follow & Unfollow Members
Messaging System (With notification)
User Widget
Related Products
Pageview Counts
Social Sharing
Lazy Image Loading
Blog Section
Add, Edit, Delete Unlimited Blog Posts
Add, Edit, Delete Unlimited Blog Categories
Dynamic Tag System for Blog Posts
Comment System for Blog Posts (With enable & disable option)
Adding Unlimited Fully Editable Pages
Show & Hide Options for Page and Page Title
Editable Location Database
Multi-Countries and One Country Options (You can use only for your country)
Responsive Ad Spaces for Any Kind of Ad Codes (Including Adsense)
Create Ad Codes
Review System (With enable & disable option)
Comment System (With enable & disable option)
Comment Approval System (With enable & disable option)
script.js: Contains custom script codes. There are custom functions and ajax post functions
jquery.cookie.js: JavaScript library for handling cookies
plugins.js: Contains javascript plugins for front-end.
Js files are separated into sections using:
//ajax post delete image
code
//datatable function
code
etc, etc.
c) Plugins
Plugins used in application:
jQuery
jQuery is a Javascript library that greatly reduces the amount of code that you must write.
jQueryUI
jQuery UI is a curated set of user interface interactions, effects, widgets, and themes built on top of the
jQuery JavaScript Library.
Ckeditor
CKEditor is a browser-based WYSIWYG content editor.
Datatables
DataTables is a plug-in for the jQuery Javascript library. It is a highly flexible tool, based upon the
foundations of progressive enhancement, and will add
advanced interaction controls to any HTML table.
ICheck
Highly customizable checkboxes and radio buttons.
Tagsinput
jQuery plugin providing a Twitter Bootstrap user interface for managing tags
Magnific Popup
Jquery Gallery plugin
Owl-Carousel
Responsive jquery slider plugin
Sweetalert
Jquery-confirm plugin
Installation
Check your PHP version before start installation. Your PHP version need to be 7.4 or a higher version.
cURL PHP extension must be enabled on your server. If you get "cURL is not available on your server! Please enable cURL to continue the installation"
error during installation, you need to enable cURL on your server.
You can enable it by adding extension=php_curl.dll line to your php.ini file. If you cannot access your php.ini file, please contact your server provider.
License Code
After purchasing the Script. You will get the License Code connected to your domain (www.___._)
If you need help, Go to our help desk ( https://mhdscripts.com/help-center/submit-request) and contact us.
You can follow these steps to install the script:
1. Create a new Database with user that has all permissions.
Go to cPanel and Click MySQL® Databases
Create New Database
Add New User
Add User To Database
Set User Permissions
2. Upload script files to your hosting (FTP).
Open your cPanel and go to File Manager section.
Go to main directory of your site. Most of the time this folder will be "public_html".
Open this folder and upload script.zip file to this folder.
Rigth click the .zip file and select Extract option.
Move all files that in the "script-v.." folder to main directory.
Delete unnecessary files/folders: "documentation", "script-v.." and "script.zip".
Make sure that the .htaccess file exists in this directory. If you cannot see it, click Settings button at the top right corner and select Show Hidden Files (dotfiles) option.
Also, cPanel can automatically change the content of this file. Please open this file and make sure the content of this file is like .htaccess below.
If you are using NGINX server, .htaccess will not work on your server. In this case, you need to make these settings in your server: NGINX configuration for CodeIgniter
Also, our script does not start from the "public" folder. So you should not add '/public' to your root variable in the server configuration file.
3. You will see this page after uploading all files to your FTP. Click "Install" to proceed.
If you cannot see this page, you can access install page by entering this link to your browser address bar: http://yourdomain.com/install
4. Enter your license code and then click Next. or Click "Go to Support System" button to get your license code.
5. Check system requirements. If one of these extensions is not enabled, you must enable it from your server settings. If all requirements are provided, click Next.
6. Check folder permissions. If all folders are writable, click Next.
7. Enter your database credentials. Click next.
If you want to change your database credentials later, you can edit the app/Config/Database.php file.
8. Enter your site URL, admin credentials and your Timezone and click finish. Site URL is your complete site address. Some examples:
Installing to Main directory: https://abc.com
Installing to subdomain: https://test.abc.com
Installing to folder: https://abc.com/test
You need to enter "http" if you don't have SSL on your site. (Example: http://abc.com)
9. Delete the install folder.
After the installation, if you see "404 Not Found" error or if you can not login to your site, please check your main directory.
There should be a .htaccess file. If you don't have this file, none of your links will work. You can find this file in the main directory of script files.
Depending on the operating system you are using, such setting files may be hidden in your computer. In this case, you may not see this file. You can see this file by making the hidden files visible on your computer.
If you completed the installation successfully, please make your SSL settings to the default settings (also explained on our Knowledge-Base)
.env Configuration File
This file contains some general settings for your site.
CI_ENVIRONMENT: Default value of this variable is "production". This option will not display if there is an error on your site.
Instead, you will see the "An error occurred!" message.
To see the errors, you need to change the value of this variable to "development".
Example:
CI_ENVIRONMENT = development
app.baseURL: This is your site base URL. It is very important to add your correct site URL to this field.
If you add a wrong site URL, your site will not work.
Examples:
Installing to Main directory: app.baseURL = https://domain.com
Installing to subdomain: app.baseURL = https://demo.domain.com
Installing to folder: app.baseURL = https://domain.com/new
LICENSE_KEY: You need to enter your license key to this field.
PAYMENT_ICONS: You can delete the payment icons that you don't want to show on your website from this line. These icons will be
displayed on the footer section and cart page.
cookie.prefix: This value is used for cookies to avoid collisions.
Default value is "mds_", but you can change this value and add a unique value for your site. You must not add a special character to this field.
File Upload Settings
If you want to upload large files, you may need to make some settings on your server. Also, Blastigo performs image optimization while uploading images. This optimization uses memory.
If you try to upload large files without doing some settings on your server, you can get an error.
If you can't upload large files, you need to set these PHP values. These are recommended minimum values.
With these settings, you can only upload files up to 32 MB in size. If you want to upload larger files, you need to increase the "32M" value.
If you think your upload will take more than 30 seconds, you can increase the max_execution_time value also.
If you cannot upload large files after making these settings, you may need to increase client_max_body_size value in your server.
To set these values follow the steps:
Go to your cPanel and click "Select PHP Version"
Then click "Switch to PHP Options"
Then set the values "upload_max_filesize", "post_max_size" and "memory_limit" as you see in the picture.
If you can not reach these settings, please contact your hosting provider and ask them to make these settings.
Quick Start
✓ Accessing Admin Panel: After installation, you will be redirected to home page. Login with your Admin email and password.
After login, you will see your username in the navigation, click your username and click "Admin Panel" link on the dropdown menu.
✓ Updating Profile Information: Go to the main navigation, click your username and click "Settings" link on the dropdown menu.
In this page you can edit your Email Address, Username, Slug and you can add some text about yourself.
✓ Changing Admin Password: Go to the main navigation, click your username and click "Settings" link on the dropdown menu. Then click "Change Password" tab. Fill in the form and change you password.
✓ Updating Contact Information: Go to the main navigation, click your username and click "Settings" link on the dropdown menu.
Then click "Contact Informations" tab. Fill in the form and update your location information.
✓ Adding Social Links to Your Profile: Go to the main navigation, click your username and click "Settings" link on the dropdown menu.
Then click "Social Media" tab. Fill in the form and update your social links.
✓ Adding Slider Item : Open your Admin Panel, go to "Slider" section from navigation and click "Add Slider Item" link, then fill in the form and click Add Slider Item button.
Then click "Social Media" tab. Fill in the form and update your social links.
✓ Adding Product : Click "Advertise Now" button that in the main navigation, then fill in the form and click Submit button. Then select your Pricing plan and add your product.
✓ Approving Product : Open your Admin Panel, go to "Products" section from navigation and click "Pending Products" link, find the product that will be approved. Then click "Select an option" button
and click "Approve" option.
✓ Adding Product Category: Open your Admin Panel, go to "Categories" section from navigation and click "Add Category" link, then fill in the form and click Add Category button.
✓ Adding Page: Open your Admin Panel, go to "Pages" section from navigation and click "Add Page" link, then fill in the form and click Add Page button.
✓ Adding Blog Post: Open your Admin Panel, go to "Blog" section from navigation and click "Add Post" link, then fill in the form and click Add Post button.
✓ Adding Blog Category: Open your Admin Panel, go to "Blog" section from navigation and click "Categories" link, then fill in the "Add Category" form and click Add Category button.
✓ Send Email to Subscribers: Open your Admin Panel, go to "Newsletter" section from navigation, then fill in the mail form and click Send Email button.
✓ Social Login Configuration: Open your Admin Panel, go to "Social Login Configuration" section from navigation, then fill in the form and click Save Changes button.
✓ Generating Sitemap: Open your Admin Panel, go to "Seo Tools" section from navigation, then click Download Sitemap button. Also you can generate your sitemap directly in your FTP
by clicking Update Sitemap button.
✓ Running Ads: If you want to add your ad codes to your website, this is very easy in the Blastigo. Open your Admin Panel, go to "Ad Spaces" section from navigation,
add your ad codes then click Save Changes button.
✓ Managing Locations: Blastigo has editeble countries and states/cities database. You can manage your locations from Location Settings section. Open your Admin Panel, go to "Location Settings" section from navigation.
If you want to edit countries, click Countries link. If you want to edit states/cities, click States link.
✓ Managing Languages: Open your Admin Panel, go to "Language Settings" section from navigation. If you want to add a new language, fill in the "Add Language" form and click Add Language button.
If you want to change default language, select the language from "Default Language" form and click Save Changes button. If you want to edit translations, find the language from "Languages" list and click
"Select an option" button, then click "Edit Translations" option and edit translations.
✓ Email Settings: Open your Admin Panel, go to "Email Settings" section from navigation, then fill in the "Email Settings" form and click Save Changes button.
✓ Payment Settings: Open your Admin Panel, go to "Payment Settings" section from navigation, then select options in the "Payment Settings" form and click Save Changes button.
You can manage daily and mounthly price from "Pricing" form. You can set your payment accounts in Paypal Account and Stripe Account forms.
Admin Panel
There are some counters in the Admin panel's home page. These counters:
Products: Shows products count
Pending Products: Shows pending products count
Blog Posts: Shows blog posts count
Members: Shows members count
Orders: Shows orders count
In addition to these counters, there are also sections that show latest records:
Latest Orders: Shows last added orders
Latest Transactions: Shows last transactions
Latest Pending Products: Shows last added pending products
Latest Products: Shows last approved products
Latest Transactions (Promoted Products): Shows last transactions for promoted products
Latest Product Reviews: Shows last added products reviews
Latest Members: Shows last registered members
Navigation
You can select your navigation design from this section. Menu Limit: You can set the number of links to appear in the menu. Other links will appear in the dropdown.
Slider
You can add, update or delete your slider items from this section.
Add Slider Item: Go to "Slider" section from navigation and fill out the Add Slider Item form.
Language:Language of the slider item.
Title: Title that will be displayed on slider image.
Description: Description that will be displayed on slider image.
Link: The URL that will be opened when this slider item clicked.
Order: Order value of the slider item.
Button Text: The text that will be showed on your button. (Buy now, shop now, etc..)
Text Color: You can select a color for texts on your slider.
Button Color: You can select a color for slider button.
Button Text Color: You can select a color for slider button text.
Animations: Blastigo has different animation options for title, description and button on the slider. You can select different animations for your slider items.
Image: Your slider image.
Update Slider Item: You can edit your slider items by clicking "Select an option" button and selecting "Edit" option.
Delete Slider Item: You can delete your slider items by clicking "Select an option" button and selecting "Delete" option.
Slider Settings
Status:You can enable & disable slider with this option.
Type: Blastigo has full-width and boxed slider options. You can select your slider type with this option.
Effect: You can select slide or fade affect for your slider. Default will be "fade".
Homepage Manager
You can manage your homepage from this section.
Featured Categories
Featured categories is the section where the selected categories are displayed under the slider. You can select the categories you want to show under the Slider from this section.
Products by Category
You can show your products by category on your homepage. You can choose the categories you want to show from this section. The last 15 products belonging to the categories will be shown in a slider.
Homepage Banners
If you want to add an advertisement or a banner for a discount on your site, you can add it from this section.
Banner URL: The URL of the advertisement or discount.
Order: Banners will be sorted by this value.
Banner Width: The width of your banner in %. Max width is 100%.
Location: You can place your banner in different location. Your banner will be placed under the section you selected.
Banner: Banner image.
Settings
Featured Categories: Option to hide or show featured categories.
Featured Products: Option to hide or show featured products.
Latest Products: Option to hide or show latest products (new arrivals).
Blog Slider: Option to hide or show blog slider.
Number of Featured Products to Show: You can set the number of featured products you want to show with this option.
Number of Latest Products to Show: You can set the number of latest products you want to show with this option.
Orders
You can see and manage ordes from this section.
Orders: Go to "Orders" section from navigation and click Orders link.
View Details: You can view all order details by select this option.
Completed/Processing: You can change order status by selecting these options.
Payment Received/Payment Not Received: You can change order payment status by selecting these options.
Delete: You can delete an order with this option.
Transactions: Go to "Orders" section from navigation and click Transactions link.
You can see payment transactions from this section.
Bank Transfers Notifications: Go to "Orders" section from navigation and click Bank Transfers Notifications link.
Buyers can report their Bank Payments from order details page. You can see these reports and you can approve & decline these requests from this section.
Invoices: Go to "Orders" section from navigation and click Invoices link. You can see all created invoices from this section.
Digital Sales
You can see all digital sales from this page. If you delete a digital sale, it will be deleted from buyers downloads page.
Earnings
Earnings: Go to "Earnings" section from navigation and click Earnings link.
You can see User earnings from this section.
User Balances: Go to "Earnings" section from navigation and click User Balances link.
You can see balance and number of total sales of all Users from this section. You can edit number of sales and balances by selecting edit option.
Payouts
Add Payout: Go to "Payouts" section from navigation and click Add Payout link.
You can add a payout for a User from this section.
Payout Requests: Go to "Payouts" section from navigation and click Payout Requests link.
Users can withdraw their money by adding a payout request. Admin will send User money and click "Completed" option for the request.
Payout amount will be decreased from User balance.
Completed Payouts: Go to "Payouts" section from navigation and click Completed Payouts link.
You can see completed payouts from this section.
Payout Settings: Go to "Payouts" section from navigation and click Payout Settings link.
You can select payouts methods and you can determine minimum payout amounts from this section.
Refund Requests (eShop Add-on)
You can manage all refund requests on the site from this section.
How it works?
There is a "Refund" section for buyers on the front side of the site. Buyers can submit a new refund request or view their previously submitted refund requests from this section.
When a buyer submits a refund request, the User of the item will see it on the "Refund Requests" section from the "advertiser Dashboard". The User can approve or reject this request. If the User approves this request, the Admin will approve this refund request and send the money to the buyer. If money for this product has been added to the User's balance before, this money will be automatically deducted from the User's account.
If the User declines this refund request, the buyer can contact the site management for this through the support desk.
Products
You can manage products from this section.
Products: You can see approved products from this page. Special Offers: You can see special discounted products in this section. Promoted Products: You can see approved promoted products from this page. Pending Products: You can see pending products (vaiting for approval) from this page. Hidden Products: You can see hidden products from this page. Expired Products: If the membership plan purchased by the User expires, and if the User does not renew the plan within 3 days, the products of this User will be added to this section. This section is only visible when the membership plans system is active. Sold Products: You can see sold products from this page. Drafts: You can see drafts from this page. Deleted Products: You can see deleted products from this page.
Options: You can see options by clicking "Select an option" button on each page.
View Details: You can see all details of a product by selecting this option.
Edit: You can edit a product by selecting this option.
Delete: You can delete a product by selecting this option.
Delete Permanently: If you want to delete a product with images and all other connected records, you can select this option.
Add to Featured: You can add a product to featured products by selecting this option.
Remove from Featured: You can remove a product from featured products by selecting this option.
Add to Special Offers: You can add a product to special offers by selecting this option.
Remove from Special Offers: You can remove a product from special offers by selecting this option.
Approve: You can approve a product by selecting this option.
Bulk Ads Upload
You can upload your Ads / products from this section with a CSV file.
Field
Description
title
Data Type: Text Required Example: Modern grey couch and pillows
slug
Data Type: Text Optional (If you leave it empty, it will be generated automatically.) Example: modern-grey-couch-and-pillows
sku
Data Type: Text Optional Example: MD-GR-6898
category_id
Data Type: Number Required Example: 1
price
Data Type: Decimal/Number Required Example 1: 50 Example 2: 45.90 Example 3: 3456.25
price_discounted
Data Type: Decimal/Number Optional Example 1: 50 Example 2: 45.90 Example 3: 3456.25
vat_rate
Data Type: Number Optional Example: 8
stock
Data Type: Number Required Example: 100
description
Data Type: Text Optional Example: It is a nice and comfortable couch...
image_url
Data Type: Text Optional Example 1: https://upload.wikimedia.org/wikipedia/commons/7/70/Labrador-sea-paamiut.jpg
Example 2: https://upload.wikimedia.org/wikipedia/commons/7/70/Labrador-sea-paamiut.jpg, https://upload.wikimedia.org/wikipedia/commons/thumb/4/42/Shaqi_jrvej.jpg/1600px-Shaqi_jrvej.jpg
**You can add multiple image links by placing commas between them.
Featured Products
Products: You can see approved featured products from this section. Pricing: You can determine daily and monthly promoted price from this section. Transactions : You can see transections for featured products payments from this section.
Quote Requests
You can see all quotue requests that sent to the Users from this section.
Categories
You can add, update or delete categories from this section.
Add Category: Go to "Categories" section from navigation and click Categories. Then fill in the Add Category form.
Category Name: Category name. You should enter according to language.
Slug: Slug for SEO friendly url. You can add custom slug. If you leave it empty, it will be generated automatically.
Description: You can add Description (Meta Tag) for category.
Keywords: You can add Keywords (Meta Tag) for category.
Order: Your categories will be listed according to this order.
Homepage Order: Your featured categories will be listed according to this order.
Parent Category: You can select a top (parent) category.
Visibility: You can hide and show a cateogory with this option.
Image: Category image.
Update Category: Go to "Categories" section from navigation and click Categories link. Find category that you want to edit and select "Edit" option by clicking "Select an option" button.
Then make your edits and click "Save Changes" button.
Delete Category: On the same list you can delete categories by selecting "Delete" option for each category.
Bulk Category Upload
Field
Description
id
Data Type: Integer Required Example: 1
name
Data Type: String Required Example: Clothing
slug
Data Type: String Required (If you leave it empty, it will be generated automatically.) Example: clothing
parent_id
Data Type: Integer Required Example: 1 You must enter 0 for parent categories.
description
Data Type: String Required Example: Category Clothing
keywords
Data Type: String Required Example: category, clothing
category_order
Data Type: Integer Required Example: 1
Custom Fields
Custom fields let you add new fields to "Advertise Now" page. Like brand, color, size... You can add, update or delete custom fields from this section.
Add Custom Field: Go to "Custom Fields" section from navigation and click Add Custom Field. Then fill in the Add Custom Field form.
Field Name: Field name. You should enter according to language.
Row Width: Field will be displayed according to this option. If you select "Full Width", it will be displayed in 100% width. If you select "Half Width", it will be displayed in 50% width.
Required: You can determine whether this field is required or not.
Where to Display: With this option you can choose where you want to show your custom field on the product details page. If you select the "Product Details" option, your custom field will appear under the product price on the product details page.
If you choose the other option, it will appear under the "Additional Information" tab.
Status: You can enable or disable field.
Order: Custom fields will be displayed according to this order.
Type: From this section you can select appropriate input type for the custom field.
Update Custom Field: Go to "Custom Fields" section from navigation and click Custom Fields link. Find custom field that you want to edit and select "Edit" option by clicking "Select an option" button.
Then make your edits and click "Save Changes" button.
Delete Custom Field: On the same list you can delete custom fields by selecting "Delete" option for each field.
You can add your custom fields to product filters. To do this, go to the "Custom Fields" section and click the "Add to Product Filters" button for your custom field.
Pages
You can add, update and delete pages from this section.
Add Page: Go to "Pages" section from navigation and click Add Page link. Then fill in the form.
Title: Page title.
Slug: Slug for SEO friendly url. You can add custom slug. If you leave it empty, it will be generated automatically.
Description: You can add Description (Meta Tag) for page.
Keywords: You can add Keywords (Meta Tag) for page.
Language: Page will be displayed according to this language
Order: Pages will order according to this value.
Location: You can select page link location.
Visibility: You can hide or show page.
Content: Page content.
Update Page: Go to "Pages"" section from navigation and click "Pages" link. Find page that you want to edit and select "Edit" option by clicking "Select an option" button.
Then make your edits and click "Save Changes" button.
Delete Page: On the same list you can delete pages by selecting "Delete" option for each page.
Blog
You can manage blog posts and blog categories from this section.
Add Blog Post: Go to "Blog" section from navigation and click Add Post link. Then fill in the form.
Title: Post title
Slug: Slug for SEO friendly url. You can add custom slug. If you leave it empty, it will be generated automatically.
Summary & Description: You can add Summary & Description (Meta Tag) for post
Keywords: You can add Keywords (Meta Tag) for page
Language: Post will be displayed according to this language
Category: Post category
Tags: You can add tags for post
Image: Post image
Content: Page content
Update Blog Post: Go to "Blog" section from navigation and click "Posts" link. Find page that you want to edit and select "Edit" option by clicking "Select an option" button.
Then make your edits and click "Save Changes" button.
Delete Page: On the same list you can delete posts by selecting "Delete" option for each post.
Add Category: Go to "Blog" section from navigation and click Categories. Then fill in the Add Category form.
Language: Category will be displayed according to this language
Category Name: Category name
Slug: Slug for SEO friendly url. You can add custom slug. If you leave it empty, it will be generated automatically.
Description: You can add Description (Meta Tag) for category.
Keywords: You can add Keywords (Meta Tag) for category.
Order: Your categories will be listed according to this order.
Update Category: Go to "Blog" section from navigation and click Categories link. Find category that you want to edit and select "Edit" option by clicking "Select an option" button.
Then make your edits and click "Save Changes" button.
Delete Category: On the same list you can delete categories by selecting "Delete" option for each category.
Location
You can manage countries, states and cities from this section.
Countries: You can add, edit and delete countries from this section. States: You can add, edit and delete states from this section. Cities: You can add, edit and delete cities from this section.
Membership Plans
Membership plans system is a system that allows you to sell membership packages with time limit and product addition limit to the Users on your site. You can manage existing plans or create new plans from the section.
Title: Name of the membership plan.
Number of Ads: The ads limit that a User can add. Users cannot add ads more than this value. If a User's total number of products reaches this limit value, adding products will be disabled.
Duration: The time limit for the subscription package to be active. If this time expires and the User does not renews the plan, the products of this User will be added to the "Expired Products" section and will not be displayed on the site. If the User renew the plan, the products will continue to be displayed on the site.
Price: The price of the plan.
Order: The added plans will be sorted by this value.
Popular: You can select this option if you want to show a "popular" badge.
Features: The features of the plan.
How It Works
After creating your membership plans, you need to activate this system from the "Settings" section in the Membership Plans section. When this system is active, every advertiser will have to buy one of these plans to add products.
If we don't want to force advertises to buy one of these plans, you can create free plans also.
Users who are not yet paid-advertisers will see these plans after clicking the "Advertise Now" button. Users will buy one of these plans, fill out the opening form, and this request will reach site management ( you can see these requests on the "Opening Requests" page). Also, advertisers can see and renew their plans from
the "Ads Shop Settings" section in the Dashboard.
Ads Shop Opening Requests
You can see the ads shop opening requests from this page. You can approve or decline a request.
Users
You can manage administrators and members from this section.
Add Administrator: You can add a new administrator from this page. Administrators: You can see administrators from this page. advertisers: You can see advertisers from this page. A user can be deleted from advertisers with "Close User Shop" option. Members: You can see members from this page. A user can be converted to a advertiser with "Open User Shop" option. Options:
Open User Ads: You can enable a member ads shop with this option. When you select this option the role of the member will be "advertiser".
Ban User: If you want to ban a member, you can select "Ban User" option by clicking "Select an option" button.
Edit: You can edit a user by selecting this option.
Delete: If you want to delete a member, you can select "Delete" option by clicking "Select an option" button.
Roles & Permissions
This system allows you to assign different roles and permissions for users using your site. You can add new roles and you can edit
permissions of these roles from this section.
Default Roles
Super Admin: This role is the main role that can manage everything in the site. We do not recommend you to assign this role
to another user. You can create a new Admin role instead of assigning this role to another user. advertiser: This role allows users to add products. When you accept a shop request of a user, the role of the user will
be advertiser. Member: This is the default role for every user in the system.
Changing a User's Role
To change the role of a user, you can go to the "Users / Members" section and select the "Change User Role" option.
Help Center
Blastigo has a help center that all users can contact the site management.
Knowledge Base
With this system, you can add all the information about how to use the features on your site, your site rules, refund conditions,
and all other information on your site. You can create different categories for your topics and add the necessary articles to these categories.
Users will see these articles on the Help Center page on the front-side of the site.
Support Tickets
You can see and reply to tickets sent by users in this section.
Storage
You can select your storage option from this section. If you select "Local Storage", all images will be stored to your server. If you select "AWS S3 Storage" option, product, blog, category images will be stored to your AWS S3 account. To use AWS S3, you should add your credentials from "AWS S3 Storage" form.
Enter your "bucket name" and select your region. "us-east-1" will be your region code and you need to enter this value from the Admin panel. Your region code can be different according to your location.
Select the "ACLs enabled" option.
Unselect the "Block all public" option and select "I acknowledge that the..." option.
Disable bucket key.
Click the "Create bucket" button.
Click the My Security Credentials option.
Click Access keys tab. Then click Create New Access Key button and create your access keys. You can need to enter these keys from "AWS S3 Storage" section in Admin panel.
Adding Created API Keys from the Admin Panel
After creating your bucket and your API keys (access key and secret key), you need to go to the Storage Section in your Admin panel and add the credentials from the AWS S3 Storage form.
AWS Access Key: Enter the access key that you created. AWS Secret Key: Enter the secret key that you created. Bucket Name: Enter your bucket name. (Example: Blastigo) Region: Enter your region code. (Example: us-east-1)
Cache System
You can enable or disable cache system from this section.
Blastigo has database cache system. If you enable this sytem, your database data will be stored in files. Where there cache files, the system will not
retrive these records from database again and this will increase your site speed. It also helps to consume less of your server resources. These cache files are
stored in "writable/cache" folder. It is recommended to enable this system if you have many products on your site.
Refresh Cache Files When Database Changes: If you select yes, the cache files will be refreshed, if there is a change in the database.
Cache Refresh Time (Minute) : Cache files will automatically refresh after this time.
SEO Tools
You can make your SEO settings from this section.
Google Analytics
You can add your Google Analytics code from here.
Generate Sitemap
You can generate a sitemap.xml file from this section.
Update Sitemap: This option will create a sitemap.xml file on your main directory. You can access this file with "http://domain.com/sitemap.xml" URL.
Download Sitemap: This option will download sitemap.xml file.
You need to create a cron job function to automatically update your sitemap. Read this section to see how you can add a cron job function in your server: Cron Job
This is the URL that you need to run with your cron job function: http://domain.com/cron/update-sitemap
**Do not forget to change "domain.com" with your domain name.
Ad Spaces
Blastigo has a mobile-friendly advertising system.
There are 2 different ad code fields for each ad space (Desktop Banner and Mobile Banner) and thanks to these options, your site will not have any design problems on mobile devices.
The Desktop Banner will be displayed on screens larger than 992px and the Mobile Banner will be displayed on screens smaller than 992px. So when adding an ad you have to fill both fields.
Ad Size: You can add an ad of any size by paying attention to the placement of the ad spaces. You need to enter the dimensions of the ad with this option. Ad Code: You will paste your ad code into this field.
AdSense Activation Code
You can add your Google Adsense code from this section. This code will be added to footer of the site and it will be enabled for all pages. After adding this code, you can add your ad codes to ad spaces.
Blastigo script does not make any changes in the ad codes you add. If you don't see ads on your site after adding your ad code, please check your ad code.
If you have added Adsense code and your ads are not displayed, you can wait for your ads to appear or you need to contact the Adsense support team. If your ads are not running, there may be a problem with your Adsense account. Our script does not affect your ad codes.
Contact Messages
You can see the messages that users sent from the contact form on the site from this section.
If you want to delete a message from list, click the Select an option button and click delete.
Reviews
You can see all reviews that users added from this section. If you want to delete a review, you can select "Delete" option by clicking "Select an option" button.
Comments
Blastigo has comment approval system. Only approved comments will be published in the site. If you want to disable this system and publish directly all the comments, you can disable this system from "Preferences" section in the Admin panel.
Pending Comments
You can see and approve the pending comments from this section.
Approved Comments
You can see and delete the approved comments from this section.
Abuse Reports
Blastigo has a system for reporting malicious or abusive content. Site members can report a product, User, comment and review. Site management can see these contents on this section and these reported contents can be seen and deleted from this section.
Newsletter
The Newsletter allows you to share some updates and interesting things with the users.
Users: All registered users are listed on this list. You can select the registered users that you want to send email and click the "Send Email" button. Subscribers: All subscribers are listed on this list. You can select the subscribers that you want to send email and click the "Send Email" button.
Settings:
Status: You can enable or disable the newsletter system with this option.
Newsletter Popup: Blastigo has a newsletter popup. New visitors will see this popup when they open the site. You can enable or disable this popup with this option.
Image: You can upload your image for the newsletter popup with this option.
To use the Newsletter section, you need to make your email settings. For this, you can read the "Email Settings" section.
Cron Job
A cron job is a Linux command for scheduling a task to be executed sometime in the future. You can set a cron job to update your sitemap, scheduled posts or RSS feeds periodically.
Follow these steps to set up cron job:
Go to your cPanel and click cron jobs.
Select the time interval that the cron job will run and your command and create the cron job.
You need to paste these commads to "Command" field and you need to create a different cron job for each task.
**Do not forget to change "domain.com" with your domain name.
These commands may not work if you do not have a management panel on your server or if you are using another panel instead of cPanel.
Cron job can be added in different ways. If this command doesn't work, you need to contact your server provider and ask for help to create a cron job.
Password Reset
To use the Password Reset section, you need to make your Email Settings. The system will send a password reset link, so it is necessary to enter
a working email server credentials to use email system. You can read more about email settings from here.
If you have not set up your email settings yet and have forgotten your password, you can reset your password from your database.
To do this, open your database via phpMyAdmin. Click on the users table and find your account in this table. Paste the following code to your password column. Make sure there is no space at the beginning or the ending of the code.
$2a$08$drmgGpMVGzdyiv7q5LUt3eUne8xh05XKrJPgMKaR3RgRwCQKXZpdu
After adding this code to your password column, you can login with "1234" password.
Preferences
You can manage your site settings from this section.
System
Classified Ads: You can enable & disable classified ads system with this option. If you disable this option, User cannot add their products without buy option.
Physical Products: You can enable & disable physical products with this option.
Digital Products: You can enable & disable digital products with this option.
Selling License Keys: You can enable & disable selling license keys system with this option.
Timezone: You can set your timezone with this field.
General
Multilingual System: You can enable or disable multilingual system with this option.
RSS System: You can enable or disable RSS system with this option.
advertiser Verification System: You can enable or disable advertiser Verification system with this option. You can disable if you want to allow all users to add products.
Show advertiser Contact Information on the Site: If you don't want to show advertisers contact information in your site, you can select "No" for this option.
Guest Checkout: You can enable or disable Guest Checkout system with this option.
Search by Location : You can enable or disable the location search section on the header of the site with this option.
Progressive Web App (PWA): You can enable or disable PWA with this option.
Ads
Approve Ads Before Publishing: If you don't want to approve User Ads, you can disable it with this option.
Featured Ads: If you don't want featured Ads in your site, you can select disable option.
advertiser Bulk Ads Upload: Users can import their ads or products with a CSV file from the dashboard. You can enable or disable this feature for the Users with this option.
Show Sold Ads on the Site: Users can set their product status to "sold". These Ads can no longer be purchased by customers. You can show or hide these Ads on your site with this option.
Product Link Structure: You can select product URL structure with this option.
Reviews & Comments
Reviews: You can enable or disable review system with this option.
Product Comments: You can enable or disable product comment system with this option.
Blog Comments: You can enable or disable blog comment system with this option.
Comment Approval System: You can enable or disable comment approval system with this option. If you disable this system, the comments will be directly displayed in your site.
Shop (eshop Addon)
Show Customer Email to User: If you do not want to show the buyer's e-mail address in the sales details and invoice, you can disable it with this option..
Show Customer Phone Number to User: If you do not want to show the buyer's phone number address in the sales details and invoice, you can disable it with this option..
Request Documents from advertisers to Open a Store: To list a product on your site, users must first submit a store request. If you want users to send some documents while sending a store opening request, you can activate this option and write the name of the files you want to be uploaded as a description.
File Upload
Image File Format: You can choose in which format your image files will be uploaded with this option. If you choose JPG, PNG or WEBP, your image files will be converted to selected file format during upload.
Product Image Upload: With this option, you can make image upload mandatory or optional.
Product Image Upload Limit: With this option, you can determine the maximum number of images that can be uploaded for a product.
Max File Size (Image): With this option, you can specify the maximum size of an image file to be uploaded.
Max File Size (Video): With this option, you can specify the maximum size of an video file to be uploaded.
Max File Size (Audio): With this option, you can specify the maximum size of an audio file to be uploaded.
Progressive Web Apps (PWA)
A Progressive Web Application (PWA) is a type of automated mobile apps for android and ios delivered through the mobile browsers, built using common web technologies including HTML, CSS and JavaScript. It is intended to work on any platform that uses a standards-compliant browser.
If you enable PWA support for your site, you can add your site to your home screen of your mobile device. You will see your application icon of your site on your mobile devices and it will work like a mobile application when you open it.
Enabling PWA for Your Site
Make sure SSL is active on your site.
Go to Admin Panel > Preferences and select "Enable" for "Progressive Web App (PWA)" option.
Open this .zip file and upload "manifest.json" and "pwa-sw.js" to root directory of your site.
Open "manifest.json" file and edit this file for your site. Change the texts in this file (name, description, short_name) for your site and replace "https://domain.com" with your domain. Example: https://mhdscripts.com
Also, you can change "ltr" to "rtl" if your language is "right to left".
If you want to change your application icon, you can change the images in the "assets/img/pwa" folder.
Adding Application Icon to the Home Screen of the Mobile Device
After enabling PWA, you will see an "+Add to Home Screen" option when you open your site with an Adroid device. If you open your site with iPhone (Safari), you can see this option in the options menu of the browser.
Genaral Settings
Genaral Settings
Application Name: Site name.
Site Title: Site title.
Home Title: Homepage title.
Site Description: Site description
Keywords: Site keywords
Footer About Section: About your site. This will be shown in the footer.
Copyright: You can update copyright section from here.
Contact Settings
Address: Your address
Email: Your email address
Phone: Your phone number
Contact Text: You can add some text about contact.
Social Media Settings
You can add your social links from this section.
Facebook Comments
If you want to use Facebook comment plugin you have to add your plugin code to this section.
Select "reCAPTCHA s2" and "I'm not a robot Checkbox" options and generate your API keys.
Maintenance Mode
If you want to prepere your site before going live or if you want to close your site to visitors, you can enable this mode. If you enable it, only Admin can access the site.
Other visitors will see a "Coming Soon!" text.
Language Settings
You can manage your language settings from this section.
Default Language: You can change your site default language from this form. Add Language: You can add a new language from this form. Languages: You can see your languages on this table and you can update or delete a language.
Also you can edit all translations in your language. To open translation page, click "Edit Translations" button.
Product Settings
Classified Ads
Price: You can enable / disable price option for classified ads products with this option. If you do not want the product price to be optional, you must select "Required".
Location: You can enable / disable Location system for classified ads products with this option.
External Link: This option allows you to add an external link for your product. If you have the same product on another website, you can add your URL to this field.
Digital Products
Demo URL: You can enable / disable demo URL option for digital products with this option.
Video Preview: You can enable / disable video preview option for digital products with this option.
Audio Preview: You can enable / disable audio preview option for digital products with this option.
External Download Link: If you want to allow advertisers to add external download link for their digital products, you can enable this option.
Allowed File Extensions: With this option, you can define the file types you allow for digital products.
Physical Products
Demo URL: You can enable / disable demo URL option for physical products with this option.
Video Preview: You can enable / disable video preview option for physical products with this option.
Audio Preview: You can enable / disable audio preview option for physical products with this option.
Payment Settings
You can make your payment settings from this section.
Status: You can enable & disable a payment gateway with this option. Mode: If you want to add your test API keys, you need to select "Sandbox", if you want to add your live keys, you need to select the "Production" option. API Keys (Client ID, Public Key, Secret Key..): These are your payment gateway API keys. To generate these keys, you need to go to the dashboard of your
payment gateway and create these API keys with your account. If you cannot create these keys, you can contact support service of your payment gateway. Base Currency: Blastigo has currency converter system. If you select a currency from this field, the system will convert the total amount in your selected currency for the payment section.
If you select "All active currencies" options, you need to sure that your payment gateway support all active currencies. Transaction Fee (%): If you want to receive a transaction fee for purchases, you can set a transaction fee rate for your payment gateway with this option.
Bank Transfer
If you want customers to send the order amount to your bank account, you can enable this option and enter your bank account details.
This payment option requires you to manually check and approve payments.
Cash on Delivery (eshop add-on)
Cash on delivery (COD) is a method of collecting payment from customers when their orders arrive. So if you want the customer to pay at the time of receiving the order, you can enable this option.
However, since this feature is also of interest to Users, if the User does not want to sell with this payment option, they can disable it for their products in the advertiser Dashboard section.
Commission & Tax Settings
Commission: If you want to get a commission for every sale on the site, you can enable this option and set your commission rate. VAT (Value-Added Tax): You can enable & disable VAT in your site with this option. If you enable this option, advertisers can add VAT for their products.
Global Taxes
Global Taxes allows you to add additional taxes on different or all countries for product sales on your site.
With this option, you may receive additional taxes for sales to the country or countries you specify.
Currency Settings
You can manage your currencies from this section.
Currency Settings
Default Currency: You can select your default currency from this field. Allow All Currencies for Ordinary Listing: You can allow all currencies for ordinary listing (classified ads) products with this option.
Currency Converter
Status: You can enable or disable currency converter system with this option. Automatically Update Exchange Rates: If you select "Yes" for this option, the system will update the currency exchange rates automatically every hour. Currency Converter API: If you want to use currency converter system on your site, you need to get API keys from one of the following websites:
All these APIs have free plans. Create your account on one of these websites by selecting "FREE" plan and get your API key. After adding this API key from this section, the system will update currency rates automatically every hour.
Only active currencies will be visible on your site. You can edit a currency to make it active or inactive.
Email Settings
To send emails, you must create a mail account on your server and you must enter your email account credentials to these fields:
Mail Service: Blastigo has Swift Mailer and PHP Mailer email libraries. It also has Mailjet API option. You can select one of them to send emails.
Mail Protocol: SMTP or Mail. Default: SMTP. But some mail servers use Mail protocol. In this case you should use Mail protocol.
Encryption: TLS or SSL. Default: TLS. If your server does not support sending with SSL, you should choose TLS.
Mail Host: Your mail server (E.g: mail.example.com)
Mail Port: Your mail port. Default: 587
Mail Username: Your username (E.g: mail@example.com)
Mail Password: Your password
Mail Title: Your email title
Reply-To: If recipients reply to your e-mail, the reply will go to this e-mail address.
Mailjet Email Service
Mailjet is an Email service that gives 200 free emails per day. You can easily use this system by creating a free account on the Mailjet site.
Go to "Email Settings" section in the Admin panel and select the "Mailjet" as the "Mail Service" option. Then add your API Key, Secret Key and Mailjet Email Address.
**In the Mailjet Email Address field, you must enter the email address you registered with the Mailjet site.
Mail Protocol
Mail protocol allows you to use the default PHP mail function and allows you to send email without any extra settings. But this function is disabled on most servers for security reasons.
If this function is active on your server, you can select the Mail protocol and use it without making any other settings.
Example:
Mail Protocol: Mail
Mail Title: Blastigo
Reply-To: noreply@domain.com
SMTP Protocol
If the Mail protocol is not working on your server, you need to use the SMTP protocol. You need a mail server for using SMTP protocol. You can use your own server or Amazon SES as your mail server.
1. Using Your Own Server
If you want to use the mail service of your own server, you can create a mail account on your server and make the necessary settings with this account.
To do this, you need to create a mail account on your server and know which protocol and port values your server uses.
If you can't see these values from your server's management panel, you can ask help from your server provider.
Example:
Mail Protocol: SMTP
Mail Library: Swift Mailer or PHP Mailer
Encryption: TLS
Mail Host: smtp.domain.com
Mail Port: 587
Mail Username: info@domain.com
Mail Password: 1234
Mail Title: Blastigo
Reply-To: noreply@domain.com
2. Using Amazon Simple E-mail Service (SES)
Amazon SES is a cloud-based email sending service. You can create your Amazon SES account and send emails with this service.
This is not a free service, check this page for pricing: https://aws.amazon.com/ses/pricing/
If you want to use this service, follow these steps to make your email settings:
Click the "Simple Email Service" link under the Services menu
Click the "SMTP Settings" link from left menu.
Click the "Create My SMTP Credentials" button.
Click the "Create" button.
Your credentials will be created after these steps.
After creating your credentials, you can add these credentials from Email Settings in the Admin panel.
Example:
Mail Protocol: SMTP
Mail Library: Swift Mailer or PHP Mailer
Encryption: TLS
Mail Host: email-smtp.us-east-1.amazonaws.com
Mail Port: 587
Mail Username: AKIAVIAANDJBBXXXXXXX
Mail Password: BPj7ailKjbITgyGF6brROnVIflfdfdydbdklsdsds
Reply-To: noreply@domain.com
If you are using Amazon SES in test mode, you need to verify the email address to which you will send a test mail and the email address that you add for the "Reply-To" field. To do this, click the Email Addresses link from the left navigation and verify the receiver email address in this section.
Sending email via Gmail will no longer be supported by us. The reason for this is that the security changes made by Google prevent the sending of emails. Sometimes, even after making the necessary settings, Gmail does not allow sending email on some servers.
You can use the Gmail server if it is working on your server, but our support team will not help with this.
Email Verification: You can enable or disable email verification from this section.
Contact Messages : If you want to send contact messages to your email address, you can select "Yes" for "Send Contact Messages to Email Address" option by adding your email address.
Social Login Settings
You can make your social login settings from this section.
If you want to use social login, you need to enable SSL on your site. In other words, all your URLs should be HTTPS.
If SSL is enabled on your site and your server automatically redirects all of your URLs to HTTPS, you can set up your social login settings.
If your site does not redirect automatically, read the "SSL and .htaccess" section.
Enter your site URL and click "Save" button. It should be a HTTPS URL. E.g: https://domain.com
Click "Facebook Login > Settings" link from sidebar menu. Enter redirect URL: "https://your domain.com/facebook-callback" and click "Save Changes" button.
Click "App Review > Permissions and Features" link from the sidebar menu. Give "Advanced Access" for the "public_profile" and "email" permissions:
Click "Settings > Basic" link from sidebar menu. Enter your domain to "App Domains" and "Privacy Policy
URL" fields.
Enter your Terms & Conditions page link to the "User Data Deletion" field.
Select a category for your application and click "Save Changes" button.
Change your APP Status to "Live". Copy "App ID" and "App Secret" values from this page and enter these
values from "Social Login" section in the Admin panel.
Enter your project name and click "Create" button.
Click the "+ Create credentials" option.
Select the "OAuth client ID" option.
Click the "Configure Consent Screen" button.
Select the "External" option and click the "Create" button.
Fill the form and click the "Save and Continue" button.
Click the "Add or Remove Scopes" button and select the first 2 options. Click the "Update" button. Then click the "Save and Continue" button.
Click the "Save and Continue" button.
Click the "Back to Dashboard" button on the next page and then click the "Publish App" button.
Click the "Credentials" link from the sidebar menu. Click the "+ Create credentials" option and select the "OAuth client ID" option.
Select the "Web Application" option, enter your App name and enter your Google redirect URL to the "Authorized redirect URIs" field.
Google redirect URL: https://domain.com/connect-with-google (Change "domain.com" with your domain name.)
Click the "Create" button.
Copy "Client ID" and "Client Secret" values and enter these values from "Social Login"section in the Admin panel.
Select "Website" option and enter your domain to "Website address" and "Base domain" fields. Click "Connect
Site" button.
Enter redirect URL to "Authorized redirect URI" field: "https://domain.com/connect-with-vk"
Copy "App ID" and "Secure Key" values and enter these values from "Social Login Configuration"
section.
Visual Settings
Visual Settings
You can make your visual settings from this section. You can change your site color, logo and favicon from this section.
Watermark: If you want to add watermarks to your images, you can enable it with this option.
Font Settings
You can change your site font from this section. Add Font
If you want to add new fonts to your site, you can add them from this section. Follow these steps to add a new font:
Click the red plus icon for the font that you want to add.
You will see "Family Selected" box at the right bottom of the page. Click on this box.
Copy the font URL and enter it to "URL" field.
E.g: <link href="https://fonts.googleapis.com/css?family=Open+Sans&display=swap" rel="stylesheet">
Copy the CSS rule and enter it to "Font Family" field.
E.g: font-family: 'Open Sans', sans-serif;
Route Settings
You can change static routes in your site from this section.
You cannot use invalid & special characters in the routes. The system will remove the invalid character when you click the save changes button.
Shipping System (eshop addon)
Blastigo has an advanced location-based shipping system that each User has their own shipping options. advertisers can manage their shipping options from the "Shipping Settings" section in the "advertiser Dashboard" section.
If advertisers sell physical products, they should add shipping options. Users must add shipping options that cover locations that they want to ship their products otherwise buyers will see "No delivery is made to the address you have chosen" warning in the basket.
Shipping Options
To add shipping options, you need to go to the Shipping Settings section and click the Add Shipping Zone button.
Zone Name:
This is the zone name that you will add. Example: International, Domestic etc.
Regions: Regions are the continent, country or state that shipping options will cover. From here, you need to select the locations where you want the shipping options to be active. You can choose more than one option. To add a region, select the location and click the Select Region button.
Shipping Methods
There are 3 different shipping options. These are Flat Rate, Local Pickup and Free Shipping.
Flat Rate: With this option, you can add a fixed shipping fee for your products. Total shipping cost is calculated according to the following three options:
Charge shipping for each product in the cart: With this option, the shipping cost will be calculated with the number of products in the cart. This option will charge one shipping cost for the same products. Example: If you select this option and set the cost to $3, the system will calculate the total cost as follows. Products in the cart: Book, Book, Pencil => $3 + 0 + $3 => $6 (The same products will not affect the shipping cost)
Charge shipping for each different product in the cart: With this option, the same products are also included in the calculation. Example: If you select this option and set the cost to $3, the system will calculate the total cost as follows. Products in the cart: Book, Book, Pencil => $3 + $3 + $3 => $9 (The same products will be included to the calculation)
Fixed shipping cost for cart total: With this option, calculation is not made according to the products in the basket. Regardless of the items in the basket, the cost you set will be the total cost. Example: If you select this option and set the cost to $8, the total shipping cost will be $8.
Local Pickup: Local pickup is a method that allows the customers to pick up the order themselves. You can add a cost for this also.
Free Shipping: If you want to add a free shipping option for your products, you can add this option as well. By entering your minimum order amount value, you can offer free shipping method after a certain basket total. Example: If you set the minimum order amount to $100 and if the total value of the products the buyer will buy from you is $101, the free shipping option will be displayed. If the total value is below $100, this option will not be displayed.
Shipping Classes
Shipping classes allow you to define different shipping costs for different products. If you want to define different shipping costs for some products, you can add shipping classes and add a different costs for these classes. You can follow these steps to do this:
Add a shipping class
To set a different cost for this shipping class, edit the flat rate methods you added before and enter a different cost for this class.
Select this shipping class during adding or editing a product
If you select a shipping class for a product, the cost you entered for that class will be used in the shipping cost calculation.
Shipping Delivery Times
If you want to add estimated shipping times for your products, you can add them from here. You can choose one of these options when adding or editing your products. Example: Ready to ship in 1 Business Day
Product Variations
If you have variations (color, shoe size etc.) for the product you're going to sell, you can add these options from the "Variations" section in the second page of the product adding section. This way, potential buyers interested in the product you're selling can choose from the options you provide and purchase the specific variant they desire.
Add Variation: By clicking here, you can add new variations to your product. When you click on "Add Variation", you will first set up the general settings for that variation. After configuring these settings and saving the variation, you can proceed to add options for that variation.
Select an Existing Variation: You can use a previously created variation for your product. For instance, if you previously created a variation for a shoe that you are selling, you can select and modify that variation for the new shoes you want to sell, saving you time on adjustments.
Add Variation
Label: Enter the name of the variation you're adding here. For example, color, size, etc. (It's recommended to be careful while typing the variation name, as it will appear on the product page.)
Variation Type: In this section, you can determine how the added variation will appear on the product page. There are five variation types you can choose based on the display method:
Radio Button (Single Selection): When you choose this variation type, customers can click on the specified variation options in adjacent boxes on the product page to view the corresponding variation of the product. For example, if you've added different color options for a dress, customers can see images of the dress in those colors when they click the options. In this type, customers can only select one option at a time.
Dropdown (Single Selection): In this variation type, options are shown with a drop-down selection box. This option allows you to link two options (parent-sub). For example, if you want to add color options for your product and if you want to add size options according to the selected color option, you need to use this variation type.
Checkbox (Multiple Selection): In this variation type, the added variations appear similarly to radio button variations, whether as text, images, or color boxes. However, customers can select multiple options from the offered variations.
Text: When you select the Text variation type, a text input box will appear on the product page for that variation. Customers can add a text to this fied during buying the product.
Number: It works the same as the text input. Customers can add a numeric values to this field during buying the product.
Option Display Type: You can choose whether the variation options will be displayed as text boxes, image boxes, or color boxes. For instance, if you're adding color options like blue and red for a dress, selecting "text" will display boxes with "blue" and "red" labels. Choosing "image" will show the images you'll set for those colors. If you select "color," color boxes for blue and red will be displayed. If you're adding options like shoe sizes, where there are numerical values, you'll need to choose "text" here. This way, the numbers you write will be displayed as text.
Show Option Images on Slider When an Option is Selected: When you select 'yes', customers will see additional images you've added specifically for that variation when they click on a product variation option. For example, if you're selling a dress in black and blue colors, apart from the main product images, you might want to add different images for each color. With this option enabled, customers can see and examine these additional images when they click to black or blue.
Use Different Price for Options: If you select 'yes,' you can set different prices for the various options of your product.
Visible: You can determine whether the added variations will be visible on the product page.
Parent Variation: If you want to add your variations with parent-sub relationship, you can select a parent variation for your variation during adding it. This feature can only be used with dropdown variation type.
**Note: Currently, you can only use the "Use Different Price for Options" option for a single variation of each product. If you've enabled this option for one variation, you won't see it for other variations you add for the same product. Therefore, if you plan to add multiple variations for a product, you should decide which variation will affect the base price of the product. For instance, if you want to add both different colors and sizes for a dress, you'll create two separate variations. You can enable the "Use Different Price for Options" option for the variation where you want to set different prices.
Edit Variation
After adding a variation for your product, you can edit it at any time by going to the variations section on the product editing page. Clicking the "Edit" option will open the same window you used when adding the variation, allowing you to modify its settings.
Delete Variation
You can delete your variations using the "Delete" option next to the "Edit" option.
Add Options
After adding your variation, you can add options for that variation. Options can be added for "Radio Button", "Dropdown" and "Checkbox" variation types. If you don't add variation options, customers will see the label you've set, but they won't have selectable options. Click "Add Option" next to the newly added variation to start defining the options. Some options you'll see here, like setting different prices for options or color selection field, are part of the choices you made during the add variation phase. You can review those choices by editing the variation.
Default Option: If you select "Yes," you only need to provide a name for this option. Selecting "Yes" means this option will display the main product's price and images. If you select "No," you can continue to add separate images and set different prices for this option.
Option Name: Here, you need to enter the name for the option you're adding.
Stock: This is where you indicate how many of the currently added variations are available in stock for the product you're selling or listing. For example, if you have 50 pieces of the same dress, with 20 being red and 30 being blue, when you're adding the blue dress as an option, you should enter "30" in the stock field.
Color: If you're aiming to show color options with color boxes on your product page, and you can't find the color selection field in the "Add Option" window, you need to select "Color" as the option display type in the variation settings. This way, you'll be able to see the color selection field. You can either choose colors from a color chart or input the color code.
Price: If you want to set a different price for a specific variation option, you can enter that price here. If you don't want to set a different price, you can leave this field empty. Alternatively, you can choose "Use default price" to make the price of this option the same as the product's base price. If you don't see this price setting in the "Add Option" window, you might have disabled it when adding the variation. You can go back to the variation's edit section and enable "Use Different Price for Options".
Discount Rate: Here, you can apply a discount for a specific variation option. If you don't want to offer a discount, you can leave this field empty or choose "No Discount". If you don't see this discount setting in the "Add Option" window, you might have disabled it when adding the variation. You can go back to the variation's edit section and enable "Use Different Price for Options".
Images: In the Images section, you can add specific images for the current variation option. For example, if you're adding a color variation for a dress, and you're adding individual colors as options, you can use the Images section to add images for each color. If you've enabled "Show Option Images on Slider When an Option is Selected" in the general settings of the color variation, customers will see these specific images when they select different colors. The images you add here are different from the images you previously added for your main product. Earlier, you added the general images of the product. In this section, you can add images for the different variations of the product.
View Options
Once you've finished adding options for a variation, you can click "View Options" at any time to review the options. You can also delete options you no longer need.
Editing Script Codes
Editing codes is not included in item support. If you want to edit the script codes, you need to edit the codes by yourself or you need to ask help from a PHP developer.
Editing HTML Codes
If you want to edit the HTML codes, you can edit the files in the "app/Views" folder.
Header: You can edit header of the site in the "app/Views/partials/_header.php" file. <head></head> tags are located in this file.
If you want to add something between these tags, you need to edit this file.
Index: You can edit homepage of the site in the "app/Views/index.php" file.
Footer: You can edit footer of the site in the "app/Views/partials/_footer.php" file.
Editing CSS Codes
If you want to edit the CSS codes, you can edit "assets/css/style.min.css" file. If you are using the Chrome browser, you need to reset the browser cache to see the changes.
Blastigo has been developed with CodeIgniter Web Framework. If you need more technical details to edit the codes, you can read CodeIgniter documentation.
Update Guide
You can find all instructions to update your site in this section. If you don't know your current version, you can check it from the "version.txt" file in the main directory of your site files.
Please take a backup of your site before you start updating. If your update fails, you can upload your backup and try again.
Follow all steps in the Updating Database (Click Here) section. You can find update_database.php file in the "documentation/updates/Update to v4.2" folder.
Clear your browser cache. This is important. If you do not clear, your browser may continue to run old codes.
Updating FTP Files
Open your cPanel and go to File Manager section.
Go to main directory of your site.
Create a new folder named "old". You can use another name. It won't make any differences.
Move all of your files to this folder.
Upload "script.zip" file to this directory.
Rigth click the .zip file and select "Extract" option.
Move all files that in the "script-v.." folder to main directory.
Delete unnecessary files/folders: "documentation", "uploads", "script-v..", "install" and "script.zip".
Copy old/uploads folder to main directory.
Open app/Config/Database.php file and enter your database credentials.
Open ".env" file that on the main directory of the script files and add your license and your site URL.


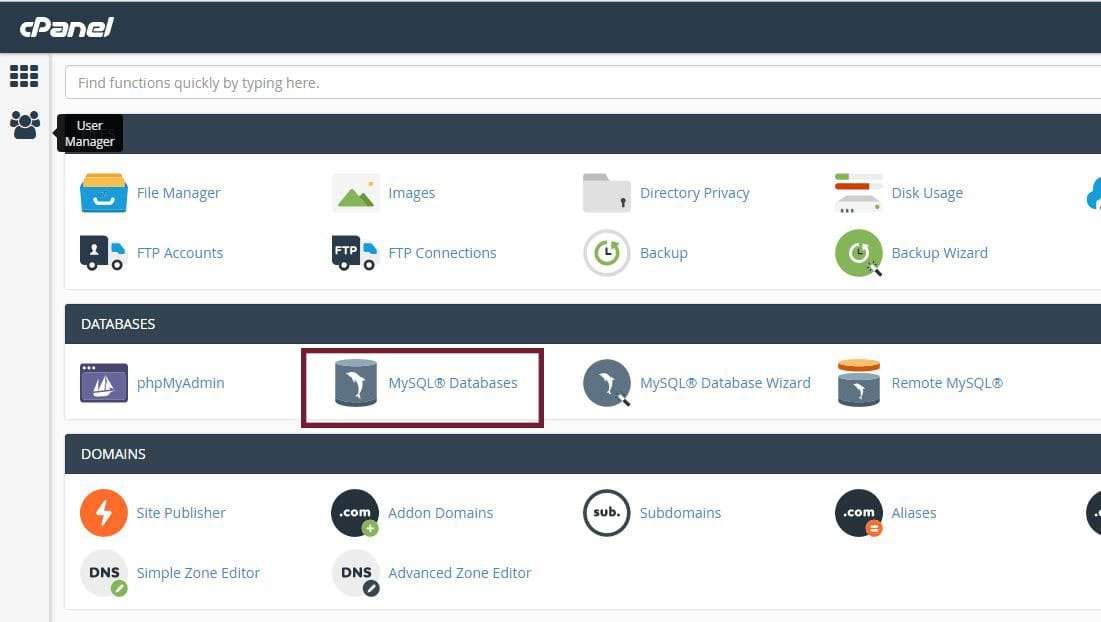

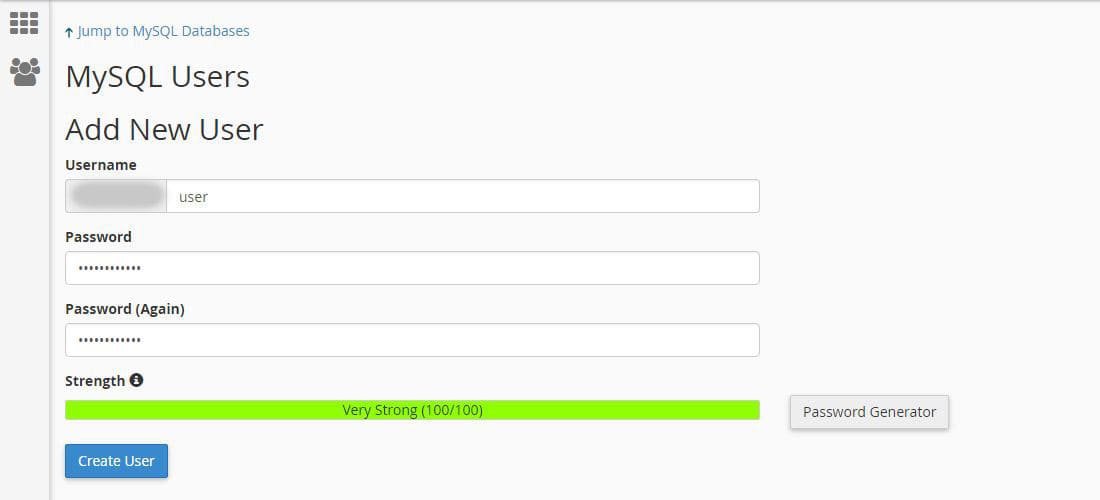
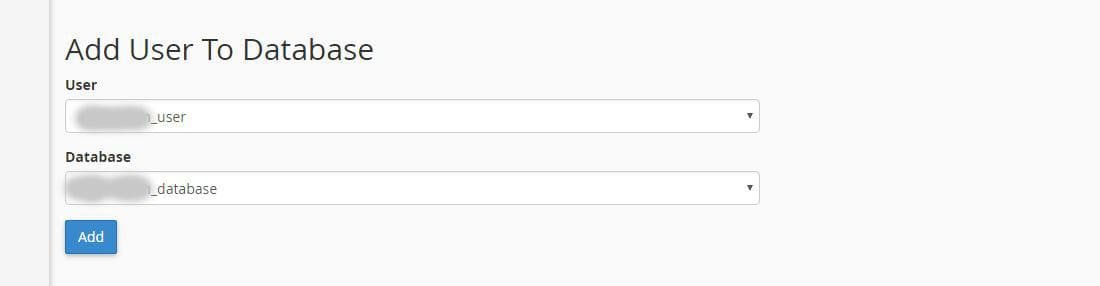


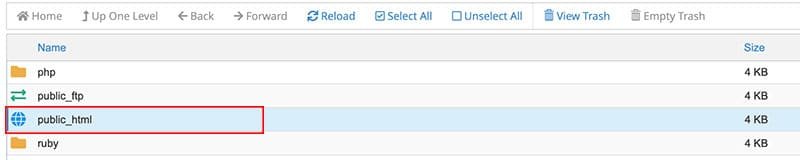


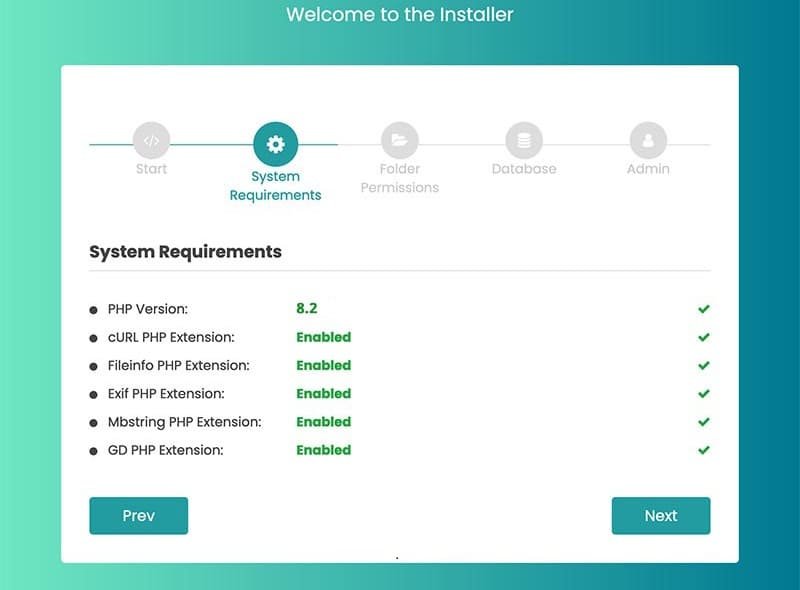

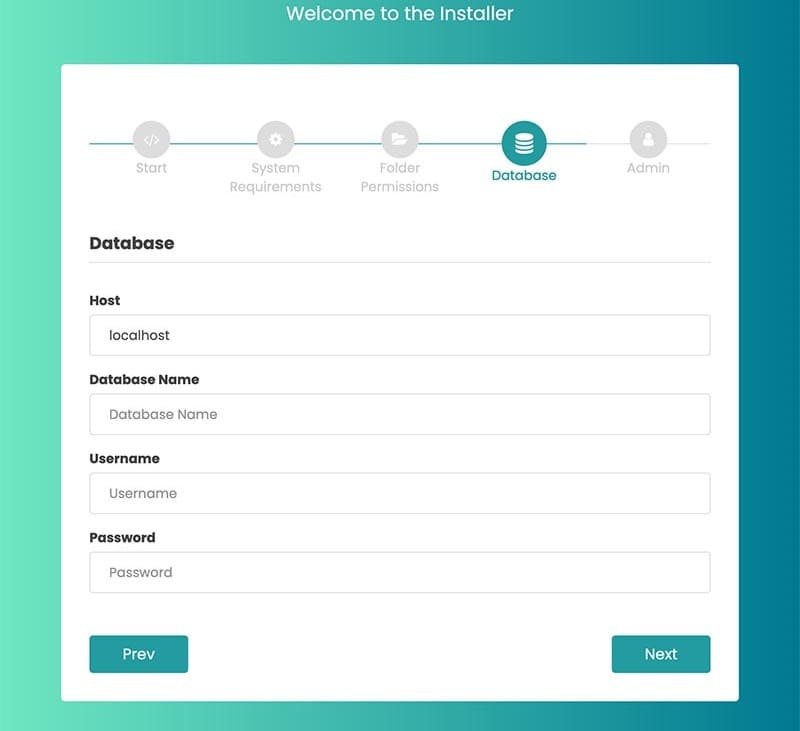
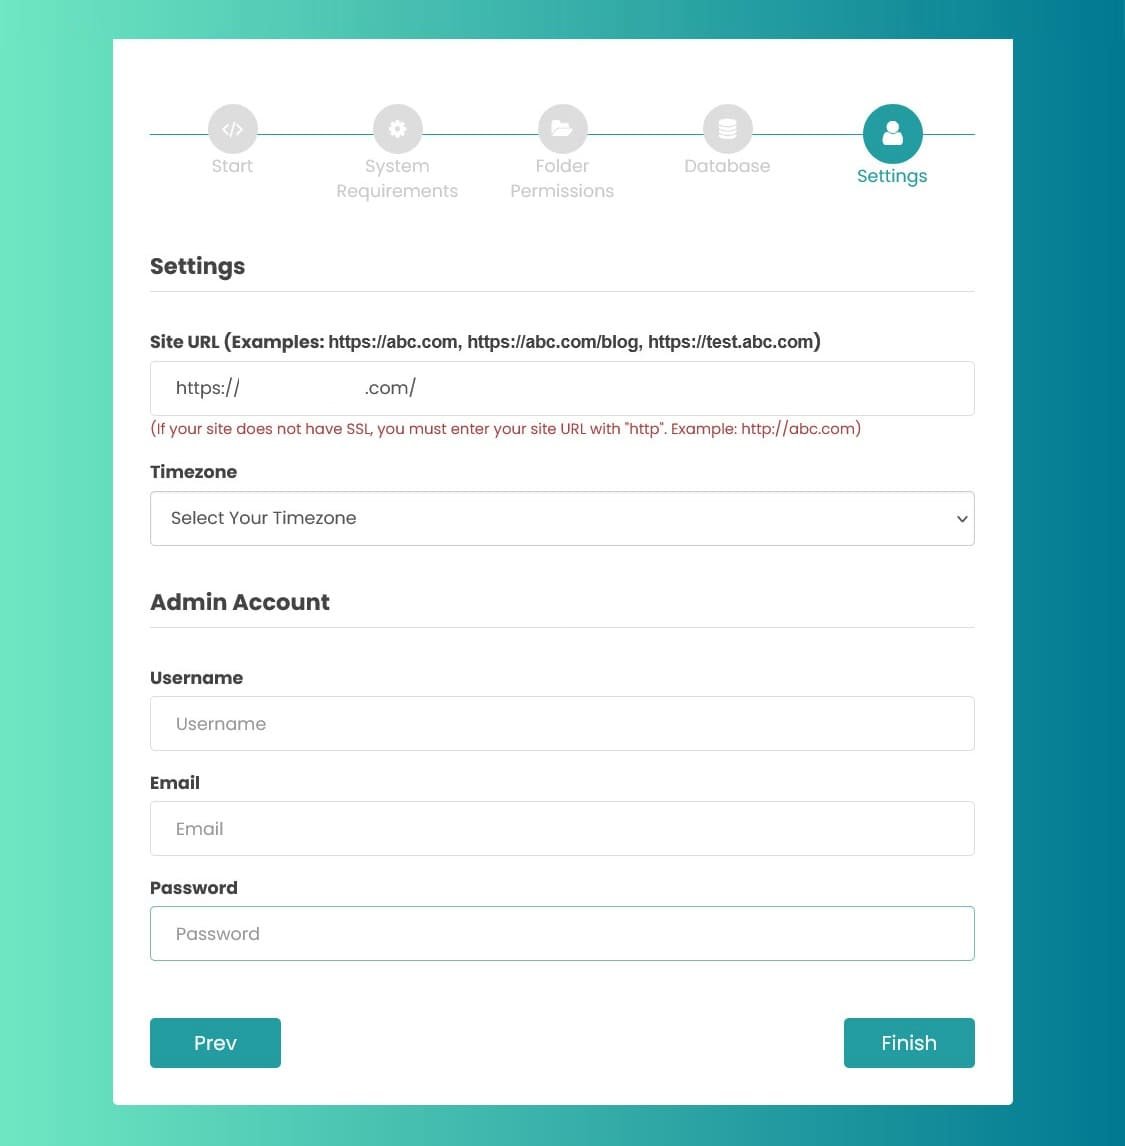

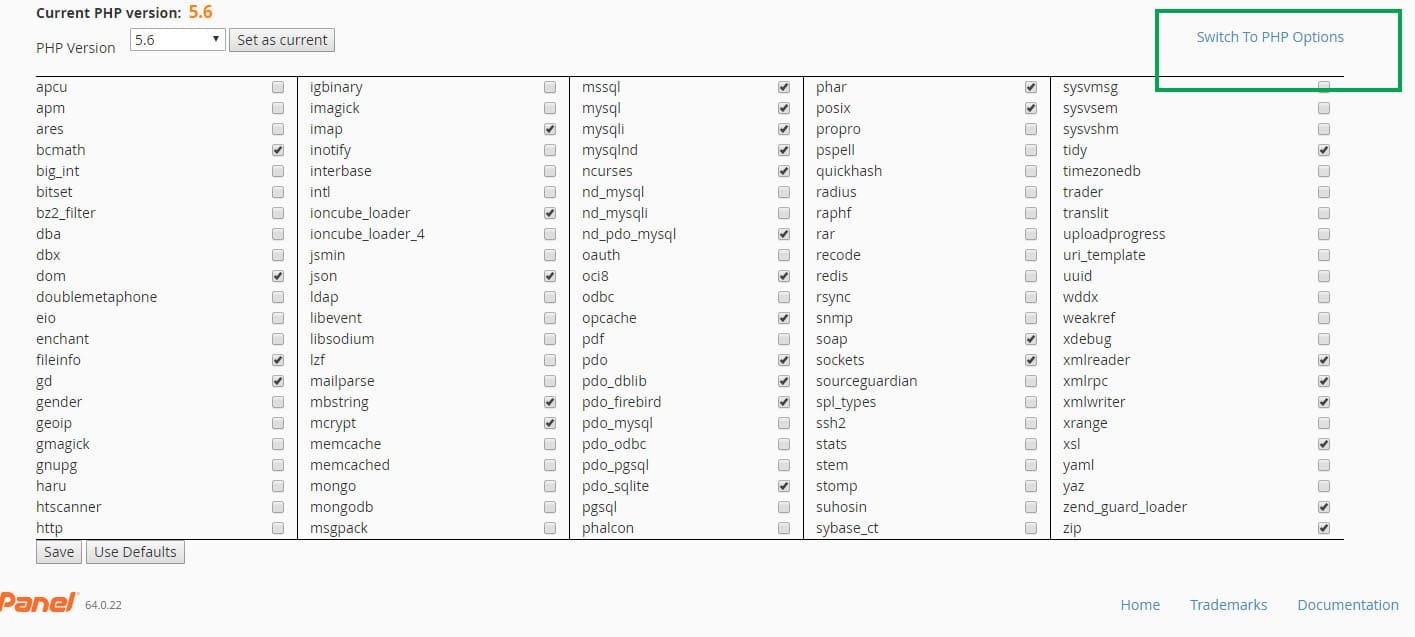

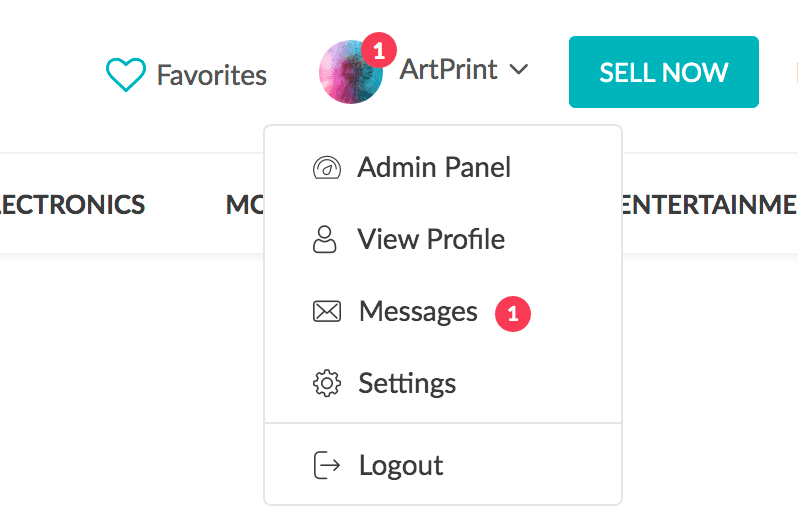


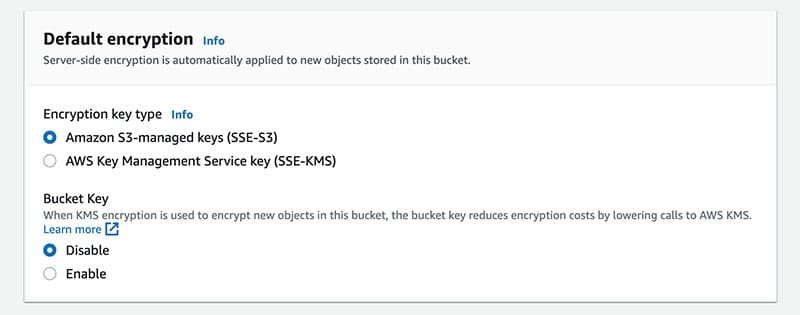
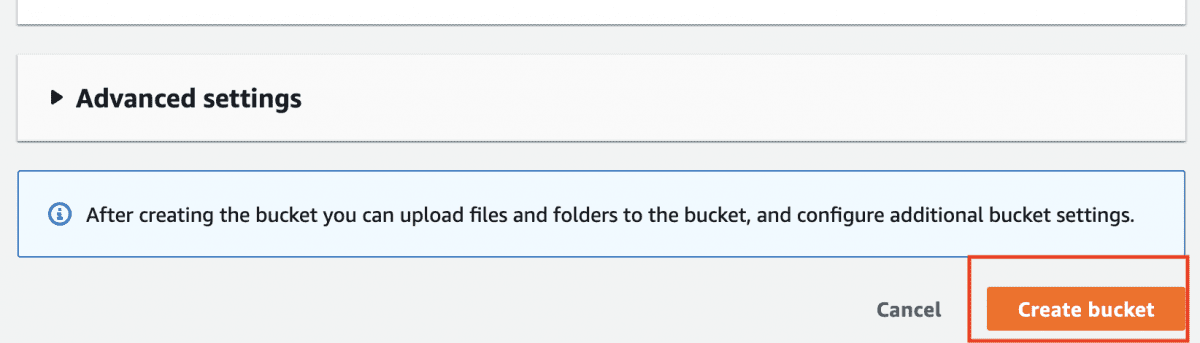


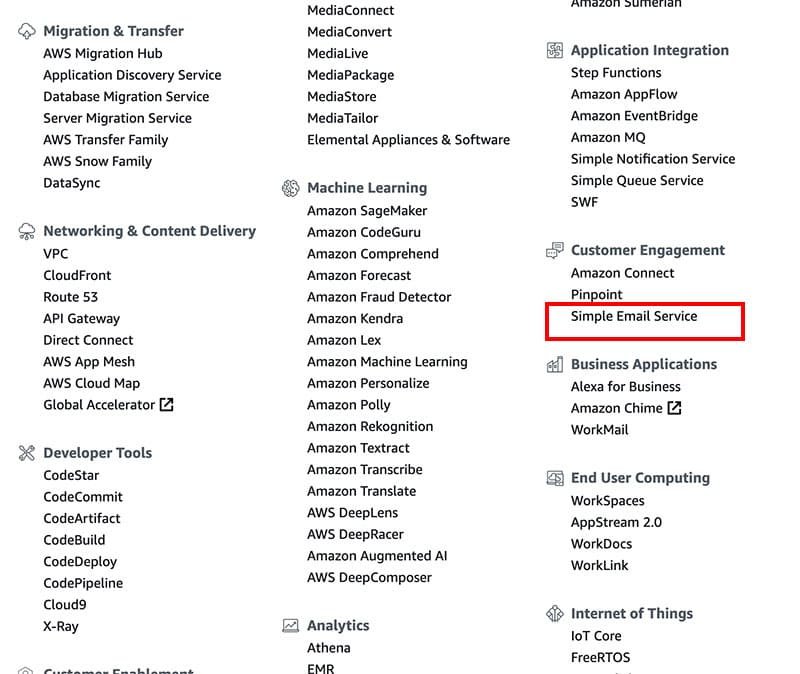
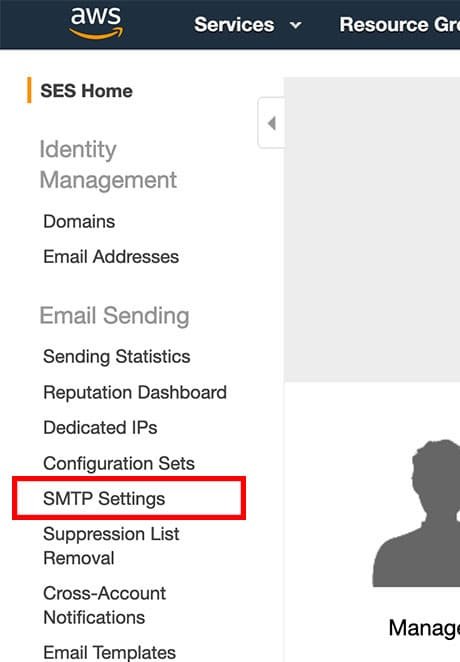
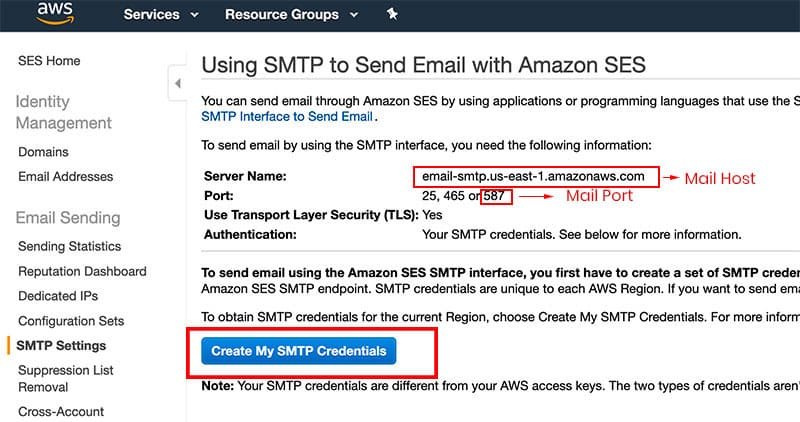
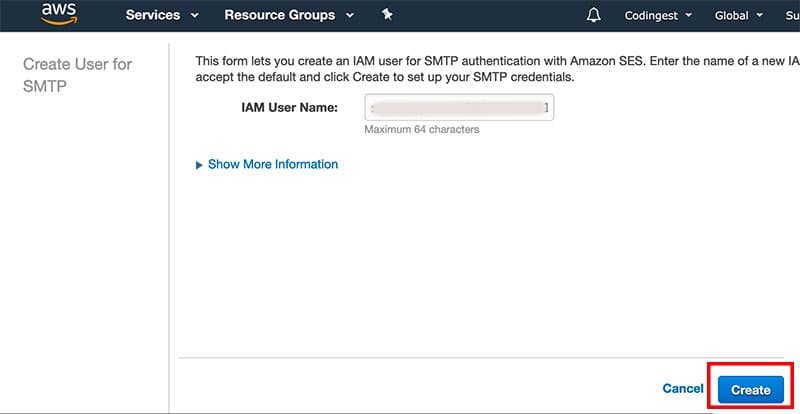
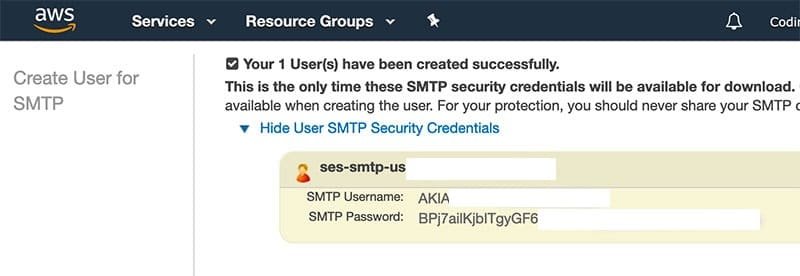


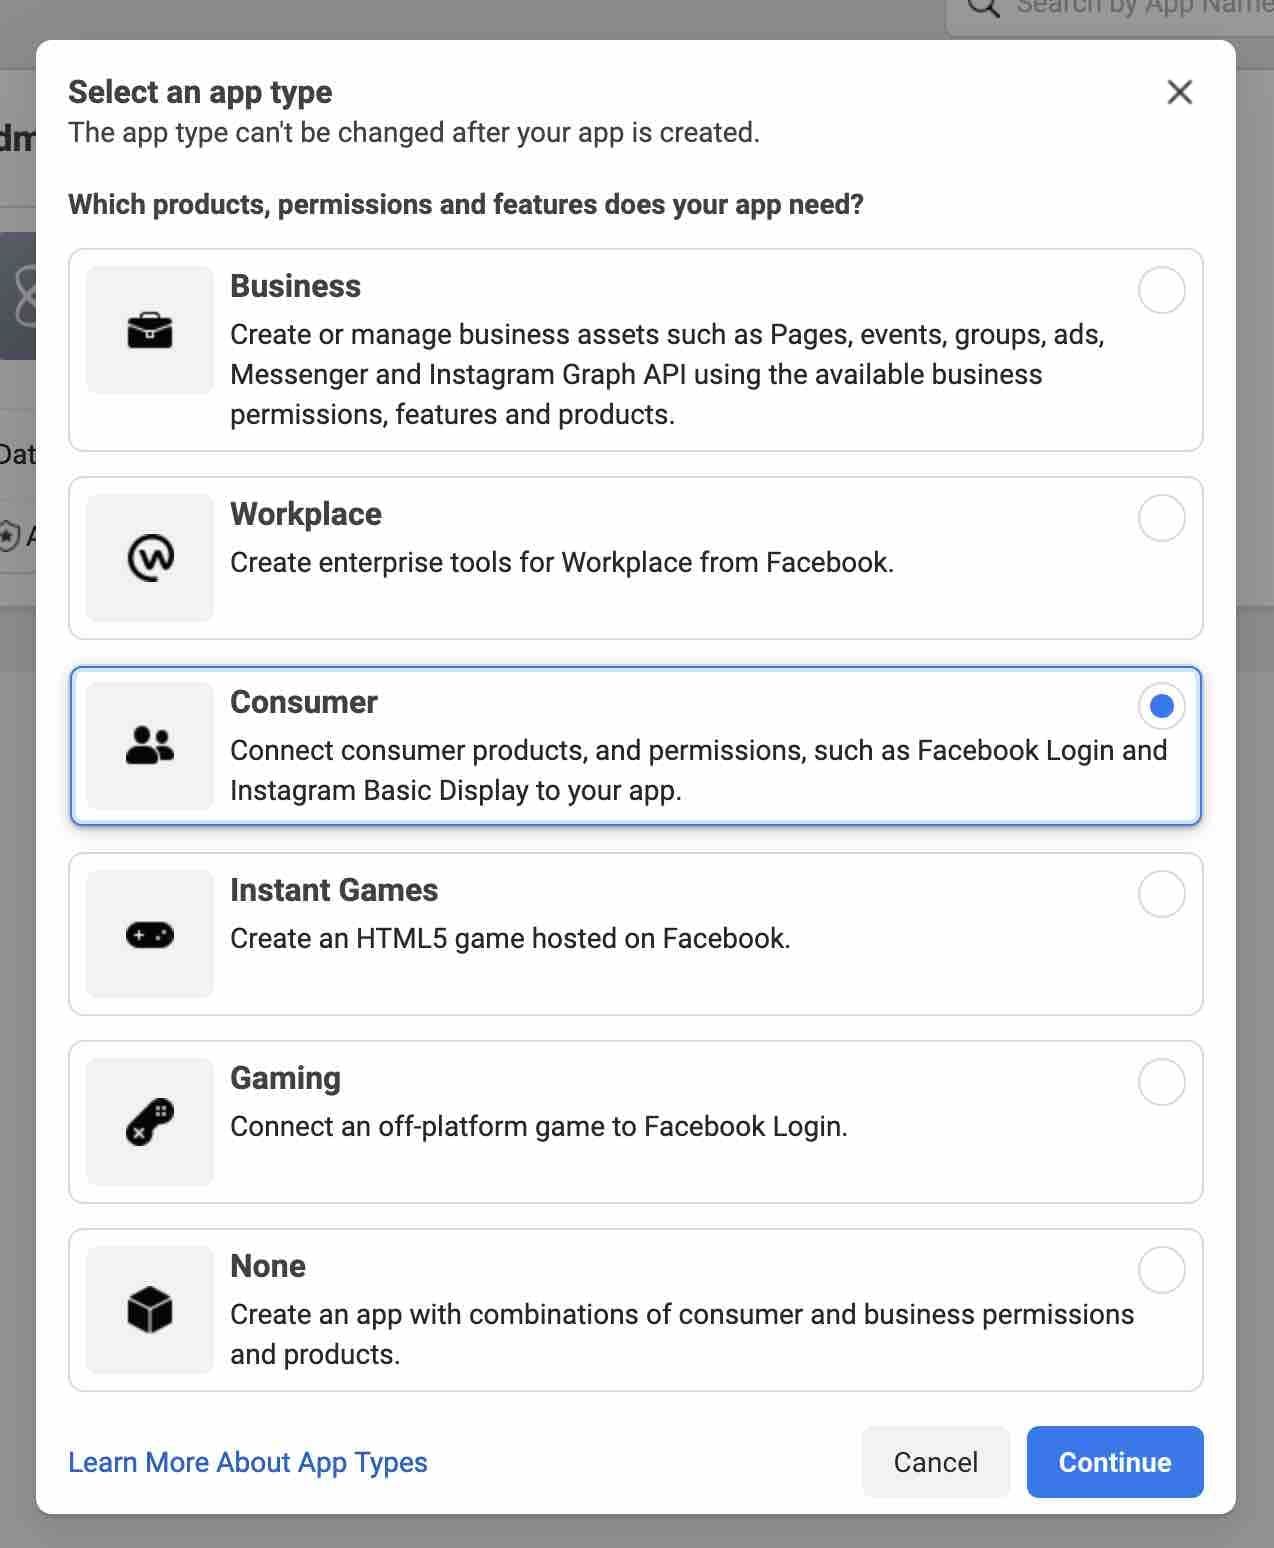


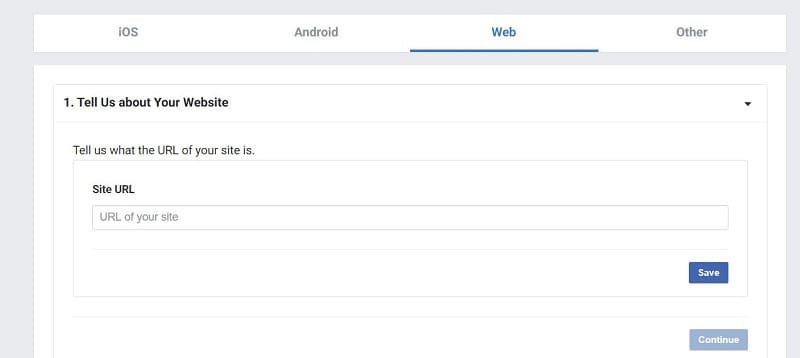

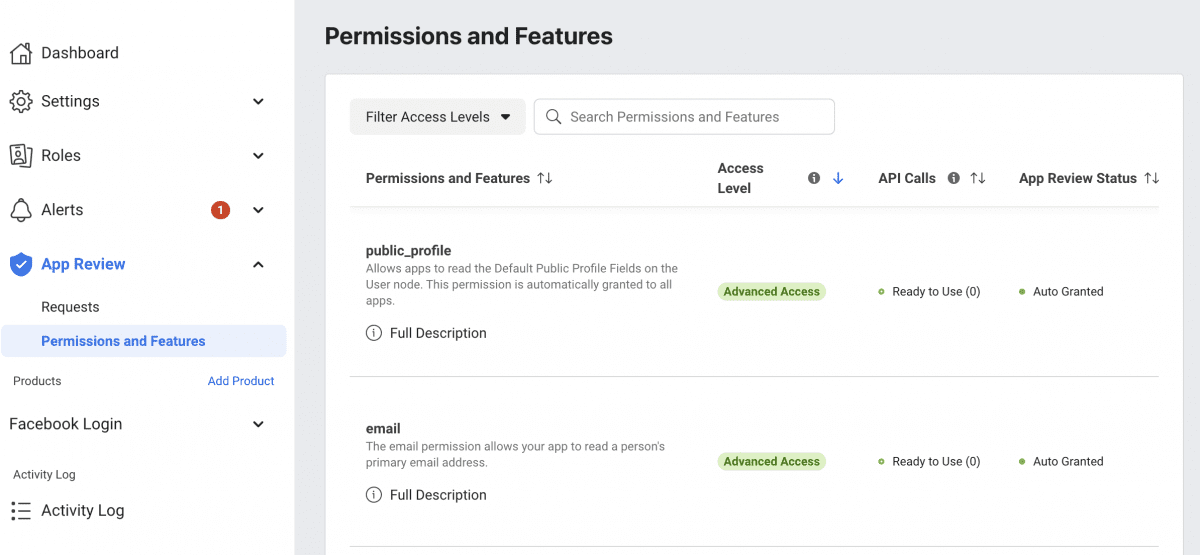


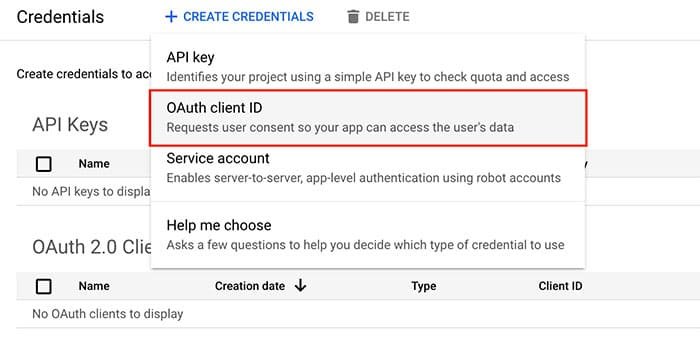
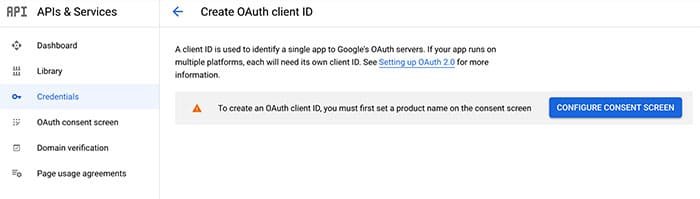


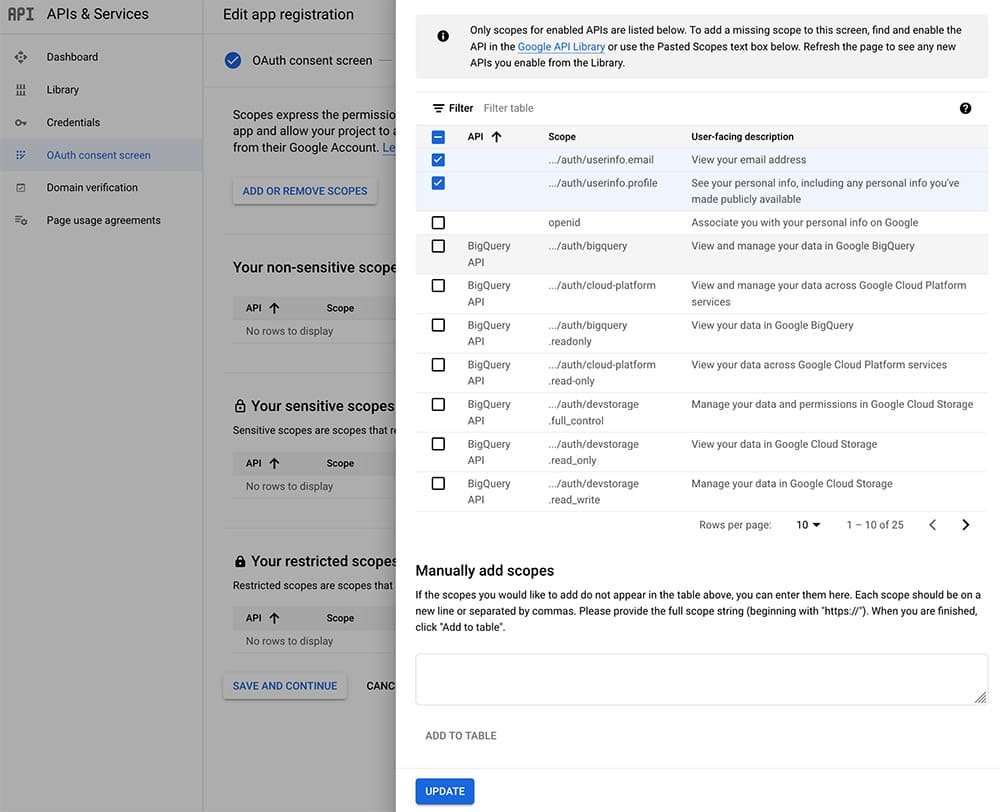

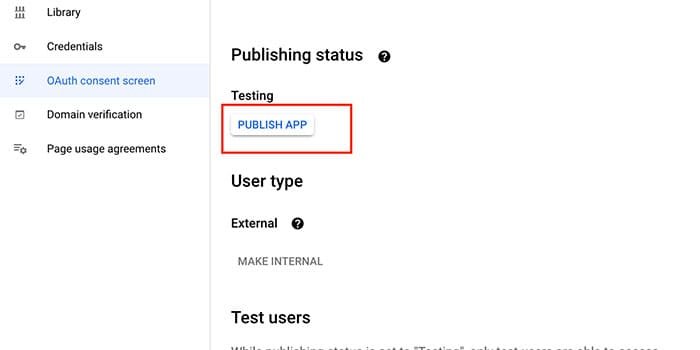
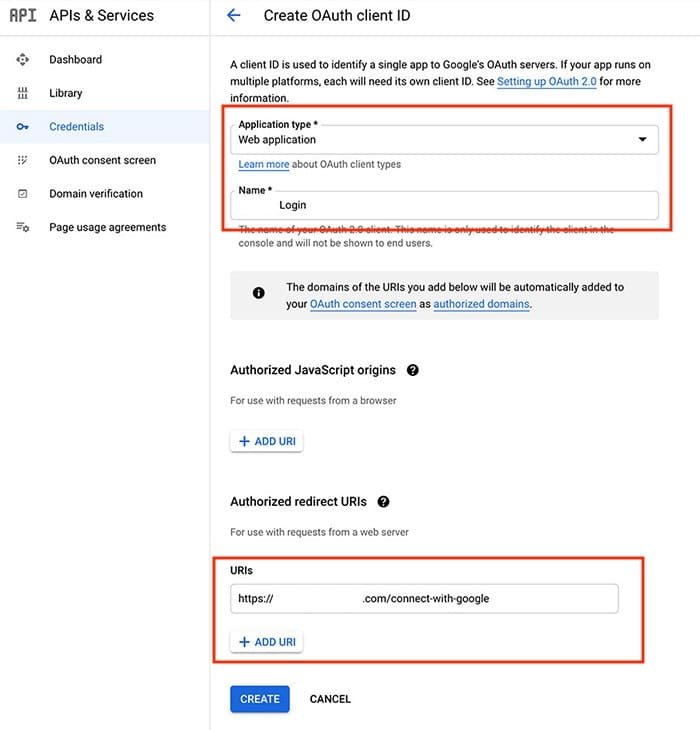


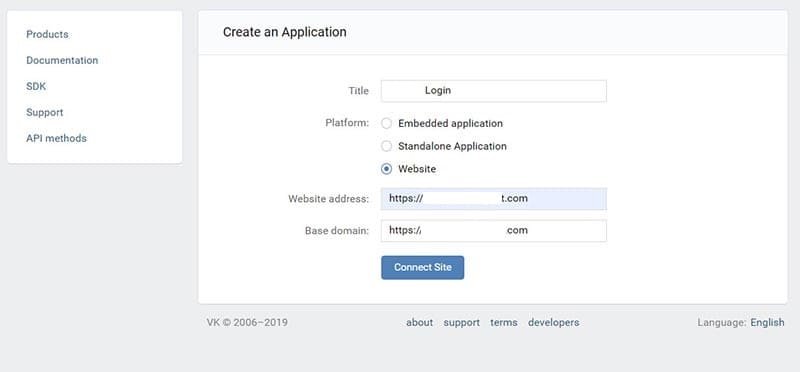
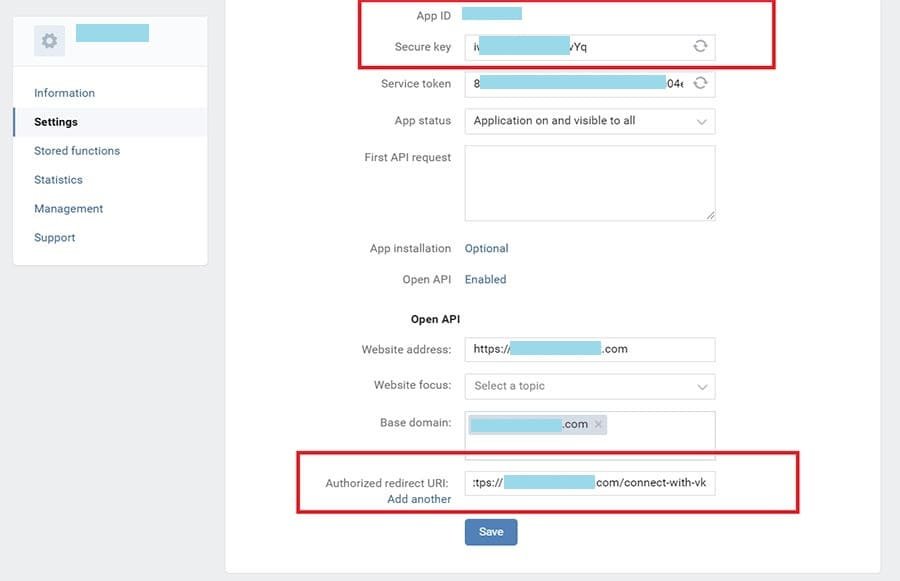

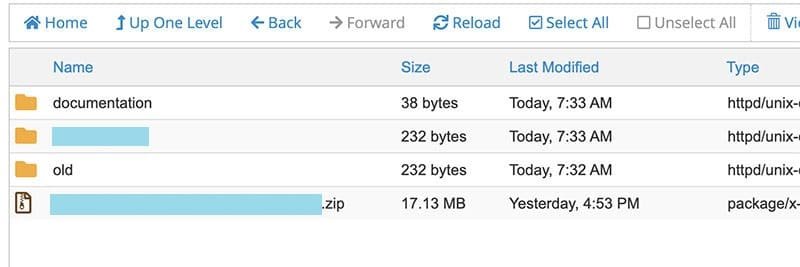


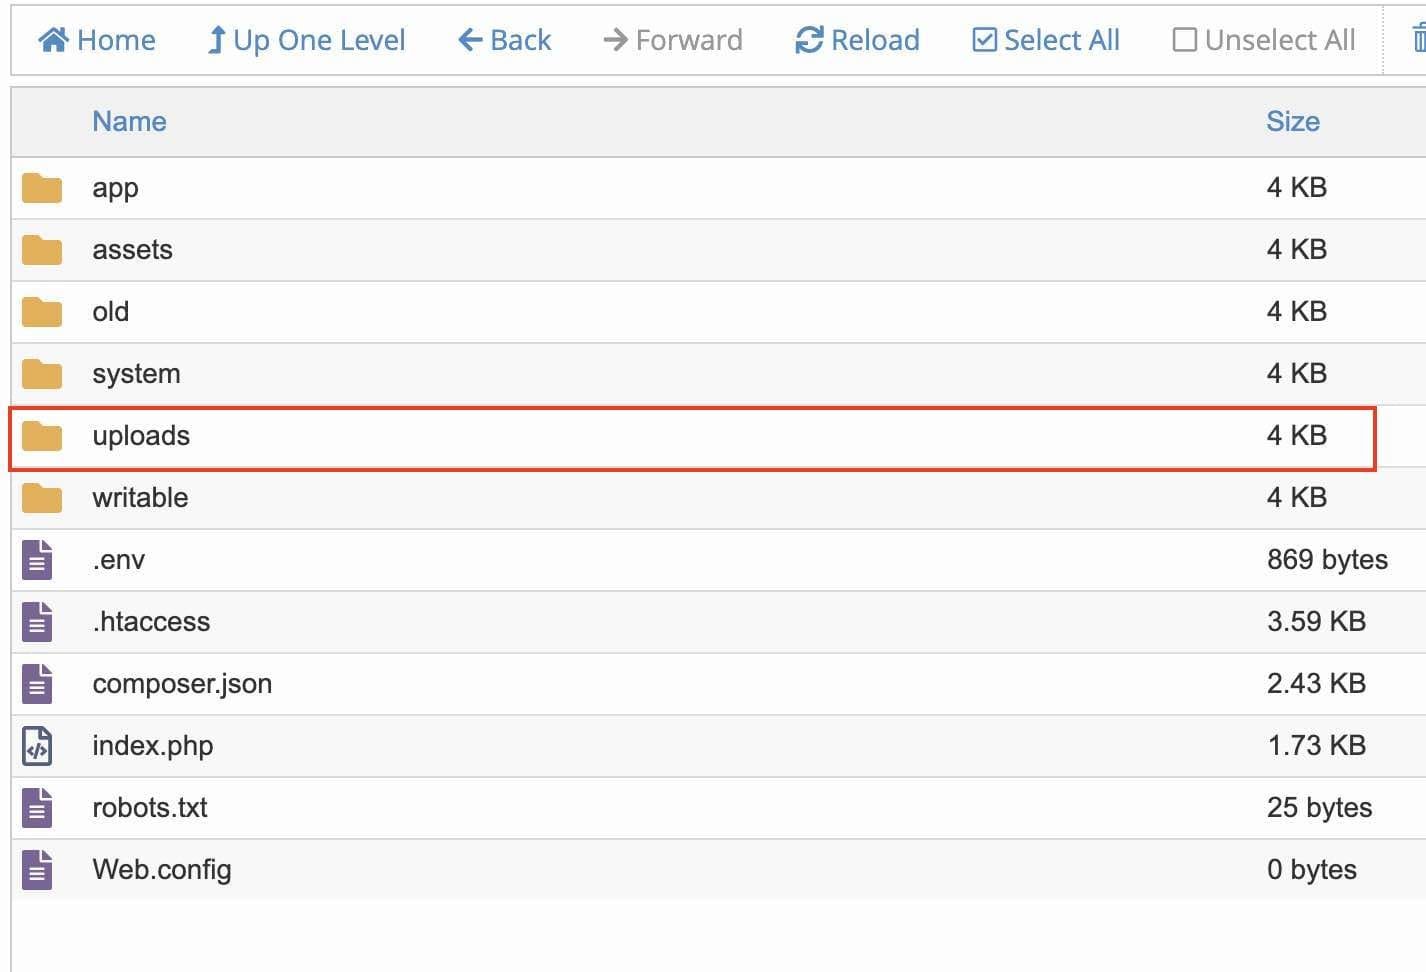


Comments
Blastigo has comment approval system. Only approved comments will be published in the site. If you want to disable this system and publish directly all the comments, you can disable this system from "Preferences" section in the Admin panel.
Pending Comments
You can see and approve the pending comments from this section.
Approved Comments
You can see and delete the approved comments from this section.